Sketchup Blog - News and Notes from the Sketchup folks

Google SketchUp in Higher Education

SketchUp has proven to be a very valuable tool for students and educators. Last year we created a video to showcase a few K12 schools who use SketchUp in interesting ways: they’re doing everything from creating models of their town buildings to designing furniture.

We now we have a new video profiling how SketchUp is being used in higher education institutions. Take a look at three areas of study (film, interior design, and architecture) from three schools (Los Angeles Film School, Art Institute of Colorado, and University of Colorado) using SketchUp to advance the skills needed by students to enter the professional world after graduation:


Permalink | Links to this post | 4 comments

Amsterdam adds another dimension in Google Earth

[Cross-posted from the Google Lat Long Blog]

For those of you who have not had the pleasure of visiting the beautiful city of Amsterdam for yourself, I’m happy to say that Google Earth now offers the next best thing: Amsterdam in 3D.

Recently, several thousand buildings have been added to the capital city of the Netherlands, Amsterdam. Using Google Maps with Earth view or Google Earth’s “3D Buildings” layer, you can now travel the city’s charming streets and canals to experience its rich architectural history. Download this KML tour from the Google Earth Gallery to take a virtual tour of the 3D landmarks for yourself.

Navigate in Google Earth to visit one of Amsterdam’s famous museums like the Rijksmuseum or the van Gogh Museum. And with the Google Art Project, take a peek inside the museum to see high-definition renditions of many famous paintings.

Van Gogh Museum (front) and Rijksmuseum (right)

Since you’re at the Museum Square already, take a look at the Concertgebouw (Concert Hall). Turn around and go along one of the three most famous canals in Amsterdam: the Herengracht, the Keizersgracht and the Prinsengracht. Don’t forget to stand still at number 263, where Anne Frank wrote her unforgettable diary during the Second World War.

Continue through the lovely small canals to the city's major square: the Dam, where you'll find the impressive 350-year old Royal Palace and the National Monument. Not far from the Dam, you can admire the Beurs van Berlage, the old Amsterdam Stock Exchange.

Beurs van Berlage, the old Amsterdam Stock Exchange

You'll find modern Amsterdam in 3D as well: next to the Central Station is the NEMO Science Center, which looks like a Flying Dutchman's ship rising from the water. Then fly south to the futuristic Amsterdam Arena football stadium.

NEMO Science Center

When you’re finished touring Amsterdam in Google Earth, head south to The Hague, where citizens are actively modeling their city with free 3D tools from Google.

Dutch citizens modeling The Hague

If you’d like to get started modeling your town, you can get started quickly with Google Building Maker (where available). Veel plezier! Posted by Jules van de Ven, Consumer Operations Dutch Market

Permalink | Links to this post | 4 comments

SketchUp Pro Case Study: Dan Tyree

Dan Tyree is an extremely prolific home designer who uses Sketchup Pro with LayOut for his presentations and documentation. He’s designed homes throughout the world. Dan writes:

I started using CAD products when they were still running on a DOS platform; I spent many years using expensive programs, but still struggled to find a good way to present in 3D for my clients. I started using Sketchup Pro as a solution for presentations, and used the DWG exporters to continue the drawings in CAD. I quickly realized that LayOut would allow me to completely eliminate my CAD program—I could create construction documents directly from the presentation model.

The Reese Residence designed in SketchUp and presented in LayOut

We use Sketchup and LayOut to create amazing presentations for our clients. We are able to show the design in rendered views or immersive videos. Clients are able to picture what the final product will be in vivid detail. We provide the SketchUp file to clients so they can experiment with colors, or just browse through their new home design. We post images and videos of the design on the client's page (on our website) for their review.


LayOut provides everything we need to create construction documents.


Next, we take the SketchUp model and link it to a LayOut document in order to start developing the construction drawings. These drawings include full-color renderings and perspective views, as well as traditional black and white parallel projections. The interaction between the two products allows us to offer changes throughout the process, even right up to the moment of final printing.

"Skiatook", presented in LayOut

PDF and CAD files are exported from LayOut. These are made available for our clients to download from our website. SketchUp and LayOut have made presenting a design and creating construction drawings a streamlined process, and have allowed us to provide an affordable custom design product.

Thank you for sharing your work with us, Dan. These documents look fantastic!

Permalink | Links to this post | 15 comments

Four new cities in Building Maker

Building Maker development continues at a torrid pace. Congratulations to the people of Rome, Italy; New Orleans, Louisiana; Long Beach, California and Malibu, also in California. Your metropolises (and/or pricey beach communities) are now proud members of the getting-less-exclusive-all-the-time cadre of cities in Building Maker. One hundred and fourteen—and counting!


Permalink | Links to this post | 7 comments

Organic modeling with the Artisan plugin

SketchUp plugin wizard Dale Martens (a.k.a. Whaat) recently released an amazing and incredibly useful organic modeling toolset called Artisan. Based on Dale’s popular Subdivide & Smooth tools, Artisan is perfect for people who want to use SketchUp to model organic shapes and terrain features. Artisan includes a set of “deformation” tools that allow you to sculpt, smooth, flatten, pinch and apply textures just like you would with a brush.

The toolbar for Dale Martens' Artisan Organic Toolset for SketchUp


Eric Lay modeled Patrick Beaulieu's "Bobby Bubble" character, then rendered him (her?) with Twilight Render.


Use Artisan's Sculpt tools to "paint" 3D deformation onto surfaces.

You can add or reduce polygon complexity in your model, allowing for more or less detail. There’s also a suite of vertex tools that you can use to model based on controlling vertex points. Oh—and did I mention that it’s a ton of fun to use? Have a look at some of the features yourself...


As anyone at the office can tell you, I’m no artist or designer, but I thought I would give the Artisan tool a try over the weekend. Below is something that I whipped up; not too shabby for an hour’s worth of work.

I modeled this hamburger. Er, yum?


If slimy, unappetizing hamburgers aren’t your thing, no worries. It’s not a stretch to see how the Artisan tools might be applied to a whole range of different markets and use cases: character design, product design, environmental design, construction, civil engineering, architecture and, of course, landscape architecture.

Peter Stoppel modeled this scooter.

Peter also modeled this wedge of landscape.


Artisan is also incredibly useful for freeform terrain modeling. This model is by Daniel Tal.

For more information and video tutorials on the Artisan Organic Toolset for SketchUp, check out this website. You’ll also find a great writeup on the Artisan tools in SketchUcation’s February issue of the CatchUp news magazine.

Thank you to Dale for building this great plugin, and special thanks to Eric Lay (a.k.a. Boofredlay), Peter Stoppel (a.k.a. Solo) and Daniel Tal for your great graphics.

Permalink | Links to this post | 4 comments

SketchUp Pro Case Study: Randy Wilkins

Randy Wilkins is a Hollywood veteran who’s worked on such films as "TRON: Legacy", "The Social Network", "The Girl with the Dragon Tattoo", "The Curious Case of Benjamin Button" and "Catch Me if You Can". We sat down with Randy to find out more about what he does and how he incorporates SketchUp (and our recently released Advanced Camera Tools plugin) into his workflow.

Where did you grow up and where do you live and work now?

I grew up in Ohio and moved out to Los Angeles to go to graduate school. I started working in the film industry immediately afterward.

What did you study in school?

My favorite subjects were architecture, history and woodworking. Of the three, I decided architecture was the best career choice. That is, it was until I fell in love with cameras. I ended up dropping out of school to work as a photographer and by the time I returned to school I had decided to get a degree in film. I graduated with a Bachelor of Fine Arts degree in Cinema from the Ohio State University. During my senior year, my thesis film at OSU was selected as a finalist for a Student Oscar. That led to a Directing Fellowship at The American Film Institute.

What do you do for a living?

Primarily, I work as a Set Designer in the film industry here in Los Angeles. I realized that being an independent filmmaker is a tough way to pay the bills; luckily, I sort of fell into set design. It was a good fit considering my architectural , drafting and photography experience and it has allowed me to work in the industry while I pursue my own films.

What projects have your worked on that folks might have heard about?

I’ve worked on over 50 films and television series over the years. The great thing about set design is that you’re always doing something different and you’re always learning something new. I just finished working on "The Girl With The Dragon Tattoo" for Production Designer Don Burt, and I also recently worked on “The Social Network” and “TRON: Legacy”.

Which of your projects are you most proud of?

I’d have to say “The Curious Case Of Benjamin Button” is one of the films I’m most proud to have worked on. I’ll always jump at a chance to do historical or classical architecture. I was also happy with the way “Catch Me If You Can” turned out. It was a very tough picture from our perspective. There were over 170 sets to create during a 70 day shoot. The fact that they were all period 1960’s and 70’s pieces made it a real challenge.

How did you first hear about SketchUp?

I first heard about SketchUp in 2003 when I saw another Set Designer using it. I was impressed with how simple it seemed to be to learn and how fast she could generate a model. It’s very hard for people who aren’t used to looking at orthographic drawings to be able to visualize them in three dimensions. We always used to build a lot of foamcore models, which can be very time consuming. To be able to quickly build something in 3D to show someone is a lifesaver when you’re working on a tight schedule.

I started learning the program in 2004 but didn’t become really proficient with it until I took a class from Mike Tadros, which was great. He’s an excellent instructor. After that I was doing most of my preliminary design work in SketchUp and then executing the drawings by hand. Until recently, most Set Designers were drawing by hand for a variety of reasons. The image below is an example of a traditional drawing for film scenery. We often do a lot of character scenery that requires us to show age or organic shapes and that’s hard to do with AutoCAD.

An example of a typical hand drawing for film scenery: A fireplace detail from “The Curious Case Of Benjamin Button”

The next three images are good examples of some of the things I love about LayOut. I can add textures, shading or even paste in some of my hand drawings into the documents. They just have a lot more "life" than CAD drawings do.

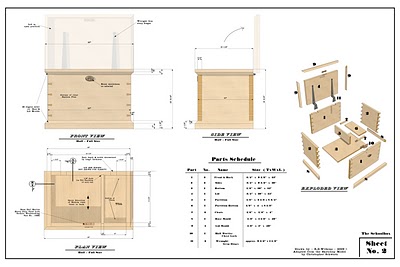
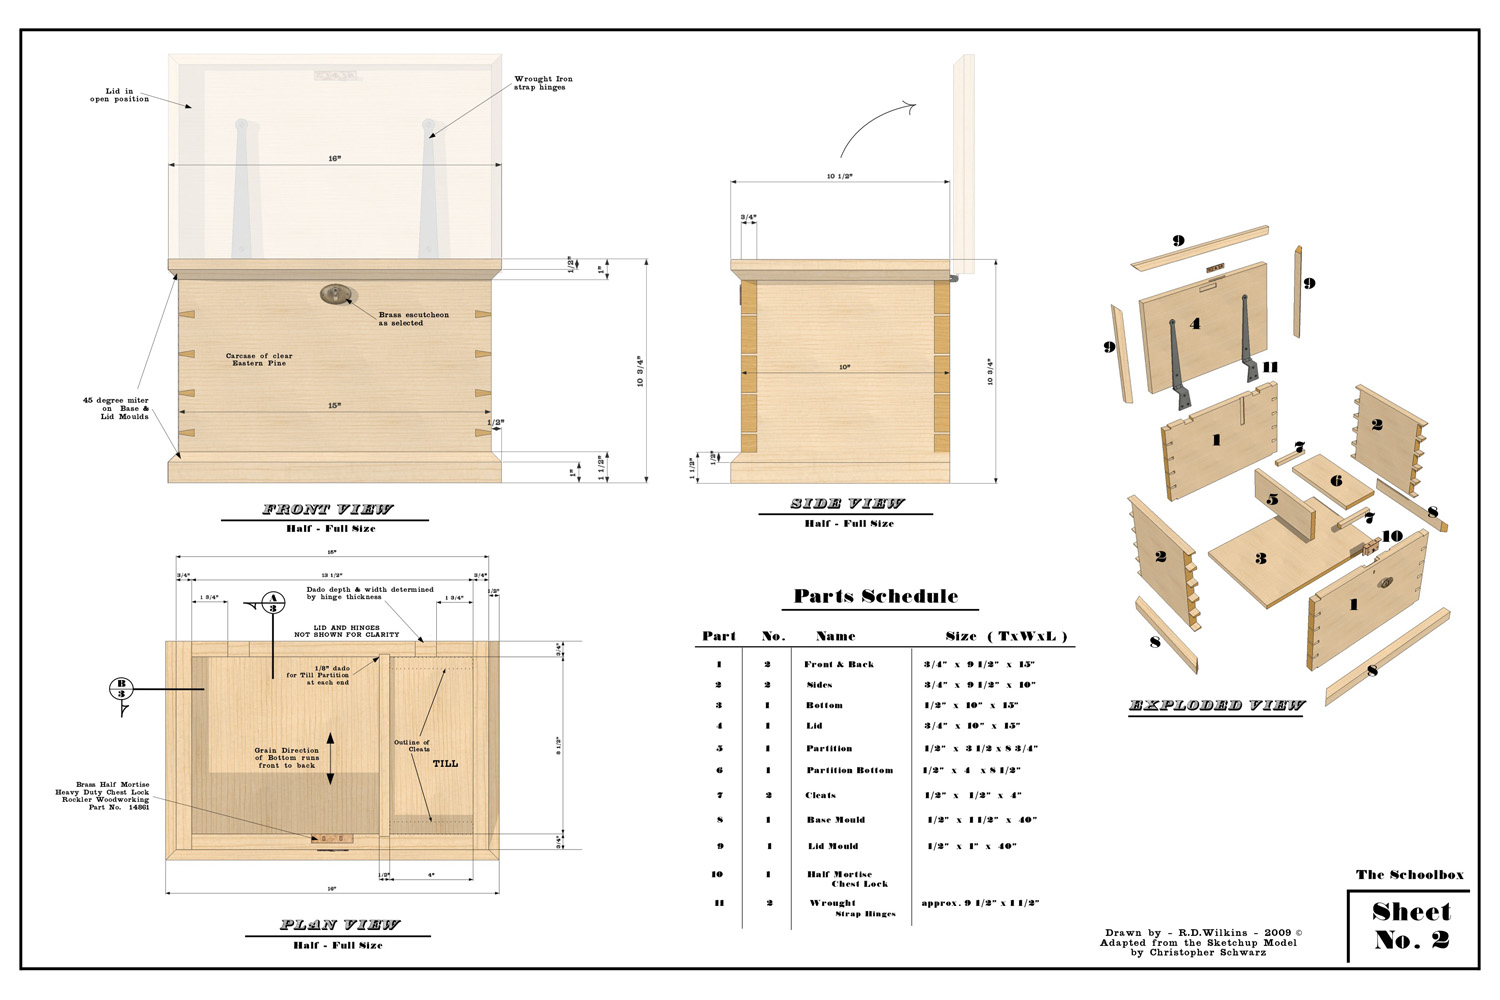
Measured drawings created in LayOut, based on a model by Popular Woodworking editor Christopher Schwarz.

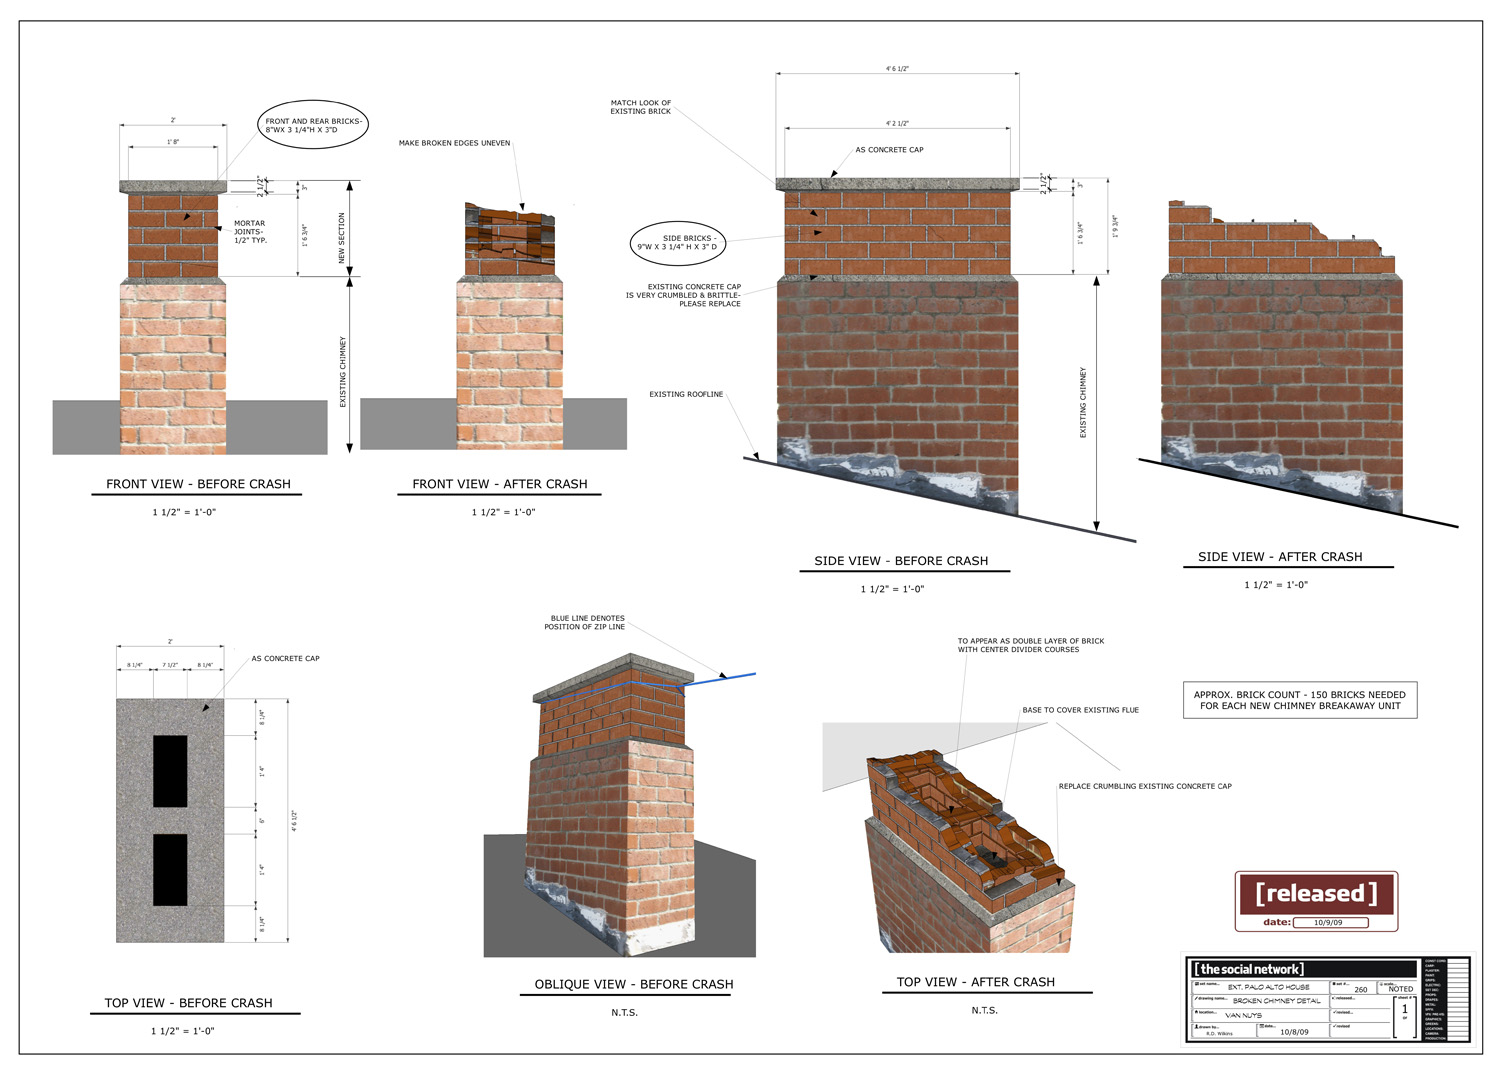
A drawing of the collapsing chimney from "The Social Network"

How does SketchUp relate to what you do?

Since LayOut was added to Sketchup Pro, I pretty much do 95% of all my work in SketchUp and LayOut, and I’m always finding new ways to use it. We have to create a lot of our drawings from photographs, either to recreate a historic building or furniture piece, or to match a location for sets built on stage or on a backlot.

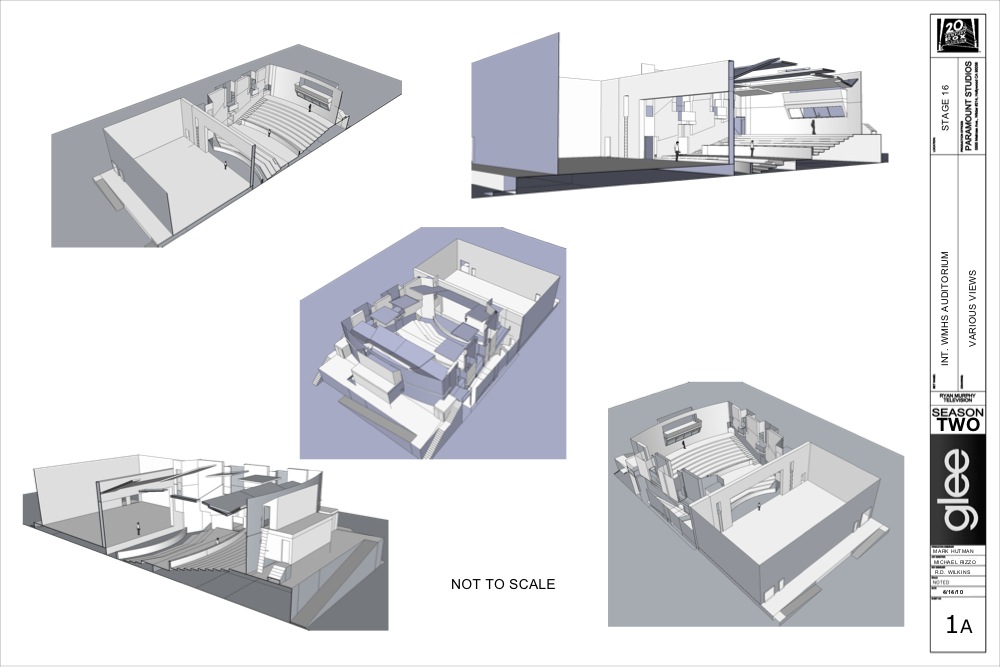
People are slowly realizing that SketchUp is much more than a modeling program. I still get surprised responses from some people when they see a drawing package I’ve done in SketchUp. I did some work last year for the television series “Glee”. They wanted to recreate the theater they used for the first season, so I surveyed the location and modeled a slightly smaller version in SketchUp and executed the drawings in LayOut. The Key Grip looked at the perspective sections I included with the drawings and said, “What program did you do this with?” He was surprised when I told him it was SketchUp.

Perspectives of the theater set model from Glee.

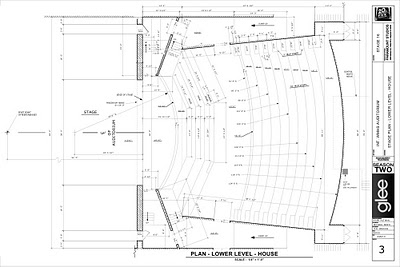
Plan view of Glee theater stage set.

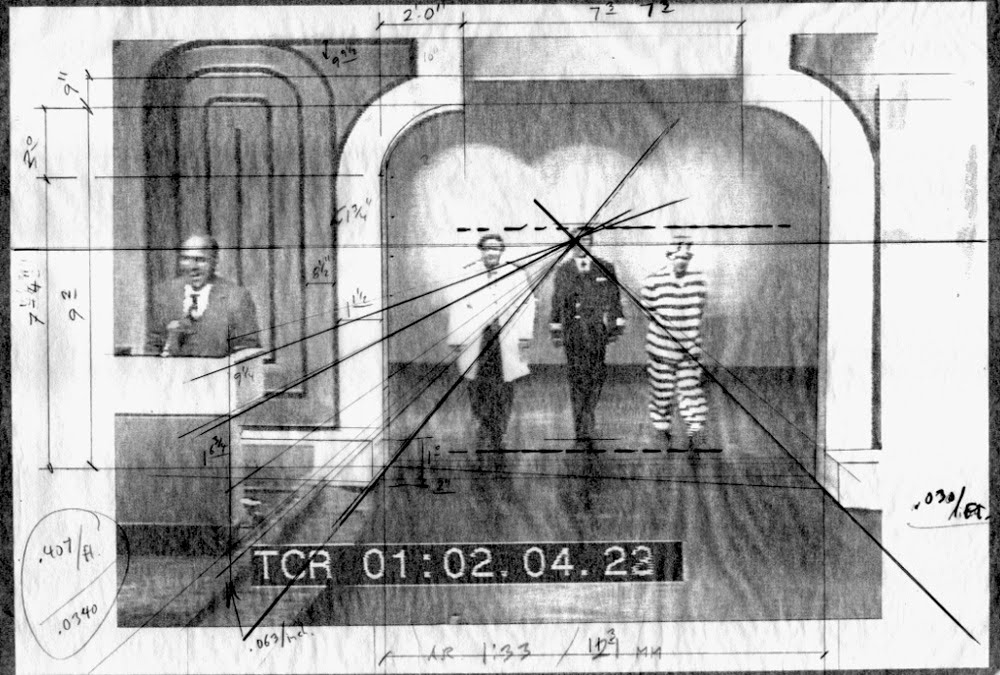
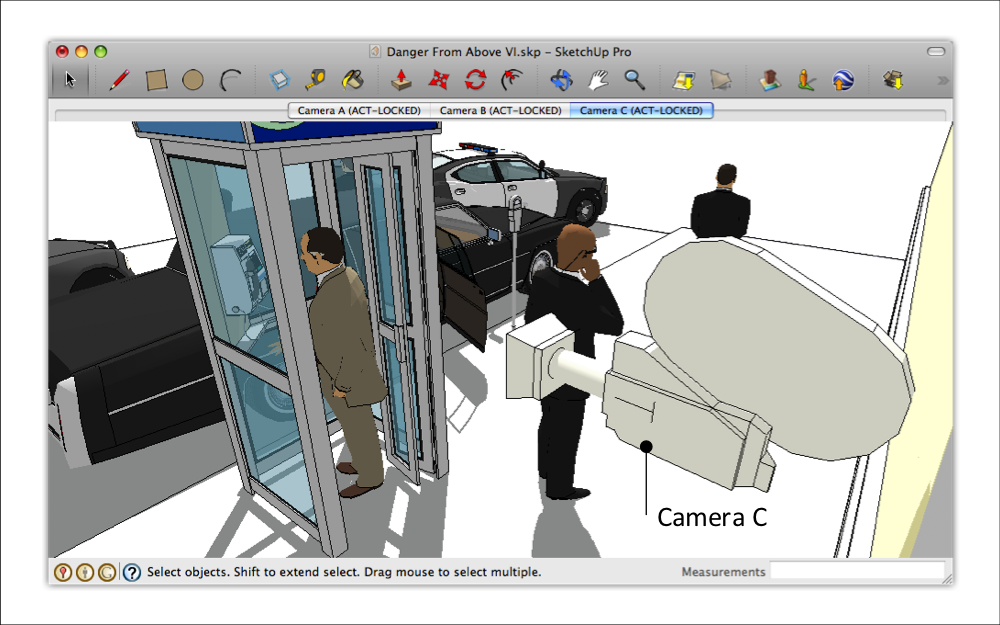
The film “Catch Me If You Can” opens with a recreation of a popular television show from the 70’s called "To Tell The Truth". Production Designer Jeannine Oppewall had me create construction drawings to build a replica of the original set that was accurate enough to matte-in portions of video from the original show. The original drawings were long gone and the only reference I had was a still from the video.

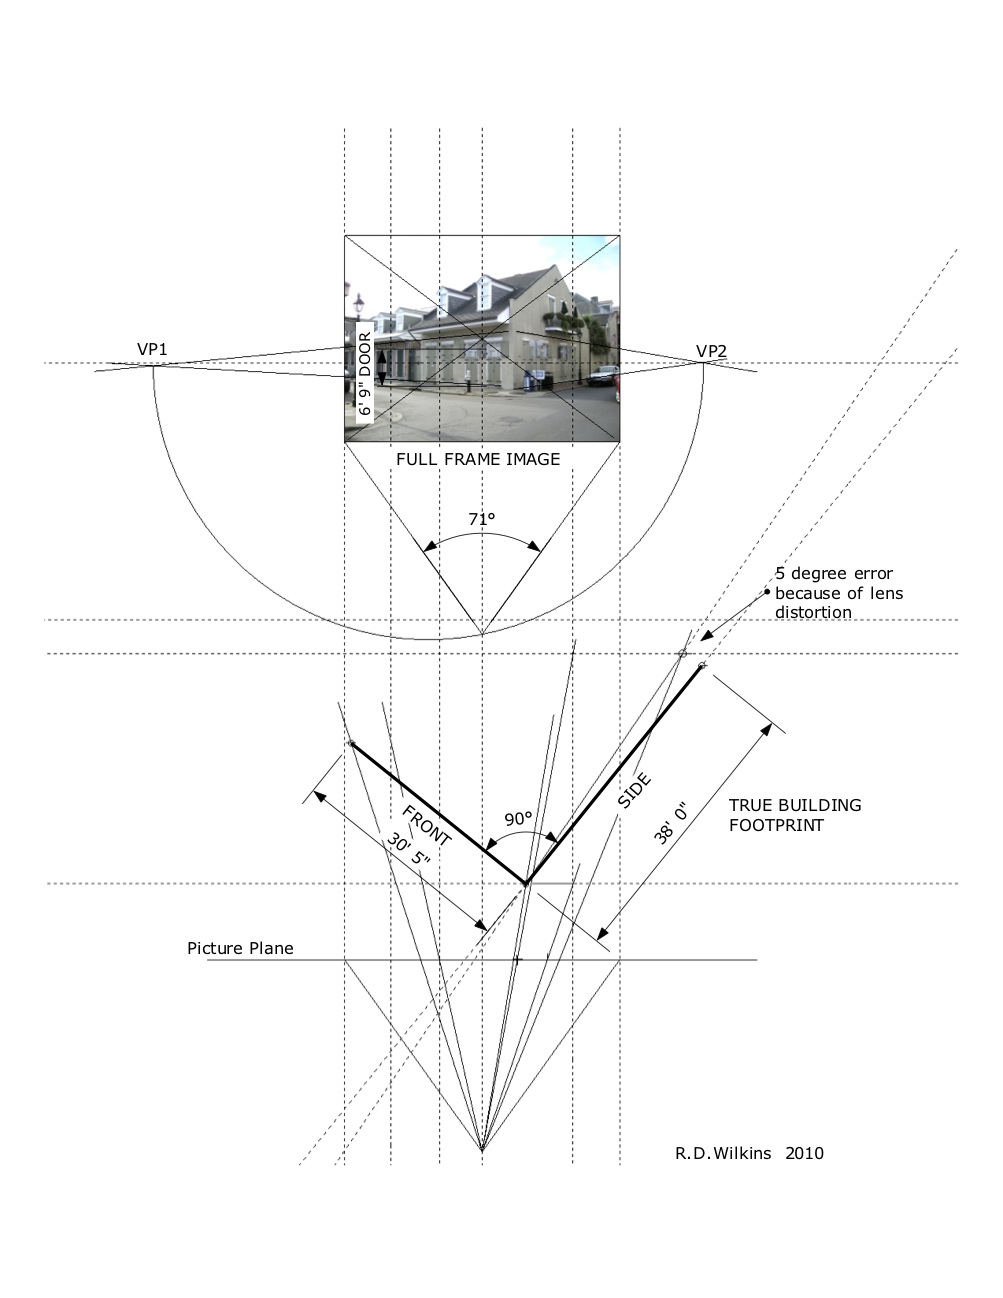
We have a technique called back-projection which basically uses the rules of perspective in reverse, as in Figure 5. From a photo we can figure out the scale to create measured drawings as well as determine the lens used, camera height and tilt and so on. I figured out it was much easier to do the process in SketchUp, where I could create the plan view right in the model, to scale (see below).

An example of back-projection calculations in pencil.

A back-projection done in SketchUp.

I’m currently working for Darren Gilford who was the Production Designer for "TRON:Legacy" and is also a big proponent of SketchUp. He does most of his design work in SketchUp which makes it great when he passes his models on to the Set Designers. There’s no scaling or back-projection involved—I know exactly what he wants.

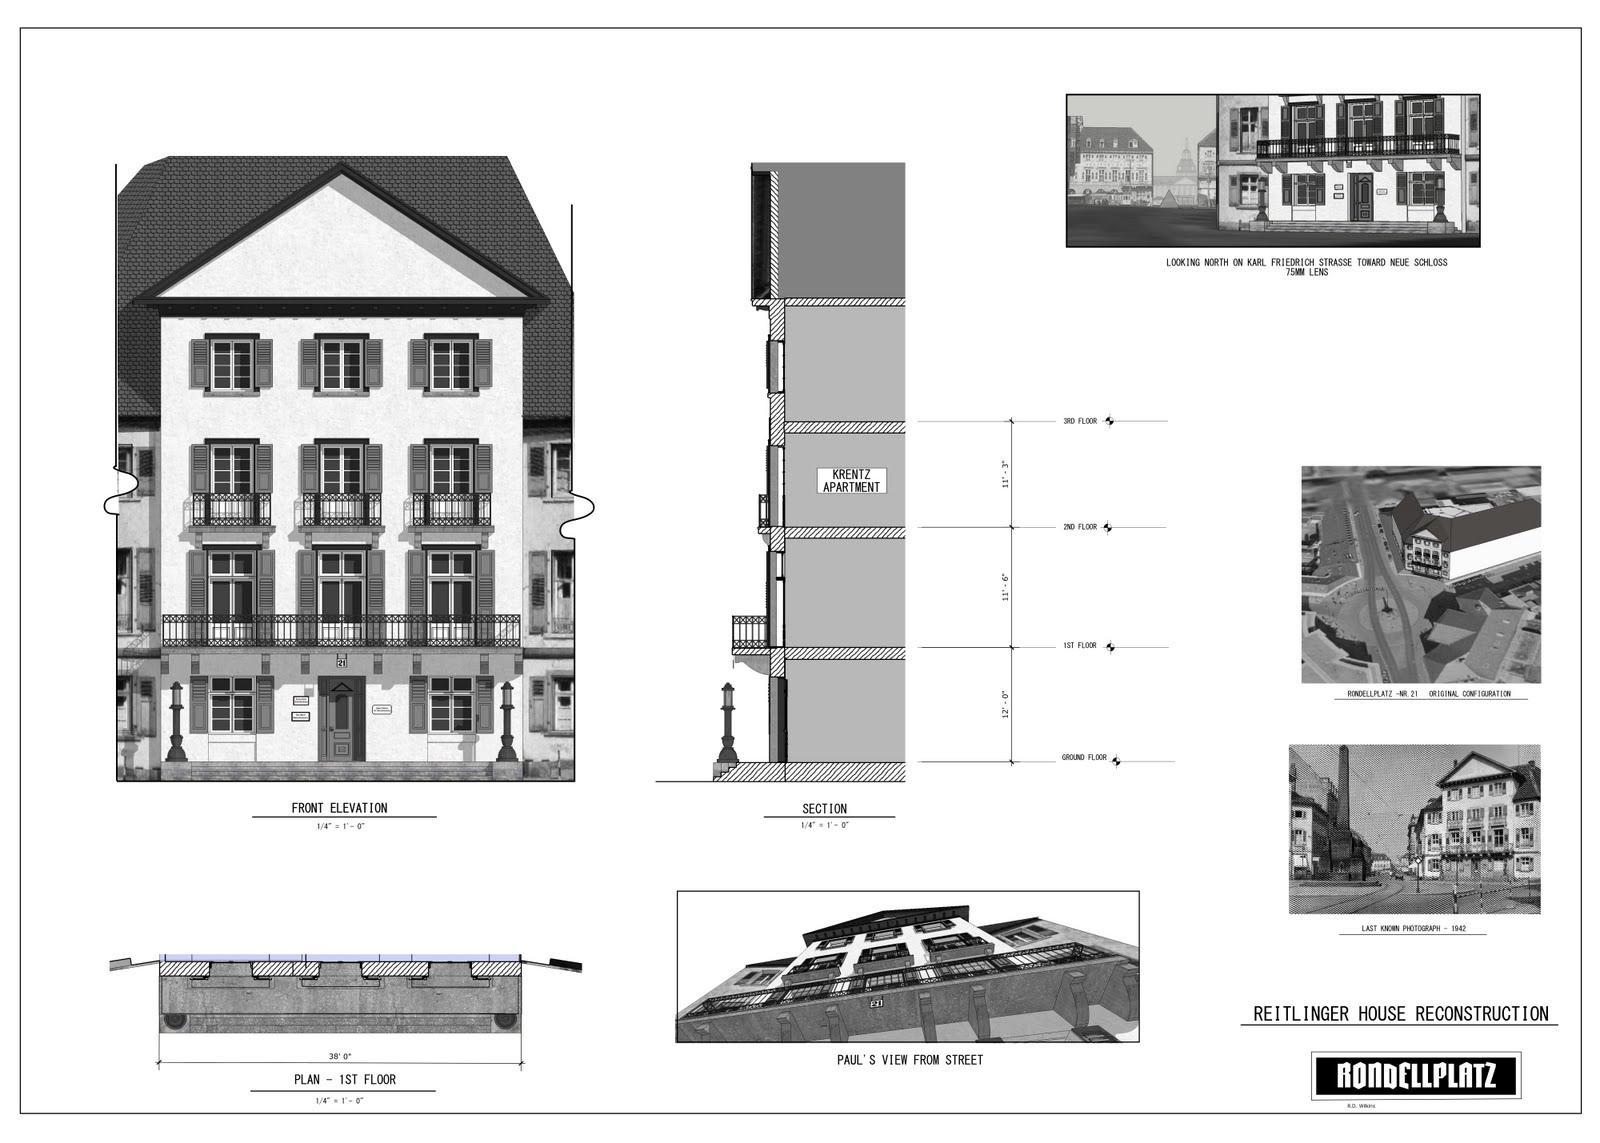
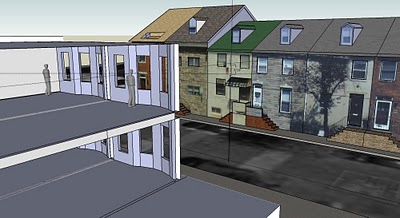
Another SketchUp tool I use a lot is Match Photo, which is a nice companion to doing a back-projection. I’ve been using it to create models of buildings that no longer exist. I have a film called “A Question Of Loyalty” which did really well on the festival circuit and several people encouraged me to expand it into a feature -length film. It takes place in Germany and deals with the loss of civil liberties in the late 1930’s. It’s set mostly in an apartment of the Reitlinger House designed by the architect Friedrich Weinbrenner which was destroyed during World War II. I used several period photos and Weinbrenner's original plan to reconstruct a SketchUp model to determine how much of the building needed to be a physical set and how much could be digital (below).

LayOut drawing of the reconstructed Reitlinger building.

Is there a specific time you can recall when SketchUp was particularly important/helpful?

There were several times while I was working on the television show "Heroes" that I really began to see the potential of the program. The show was very ambitious; it was like making a feature film every eight days.

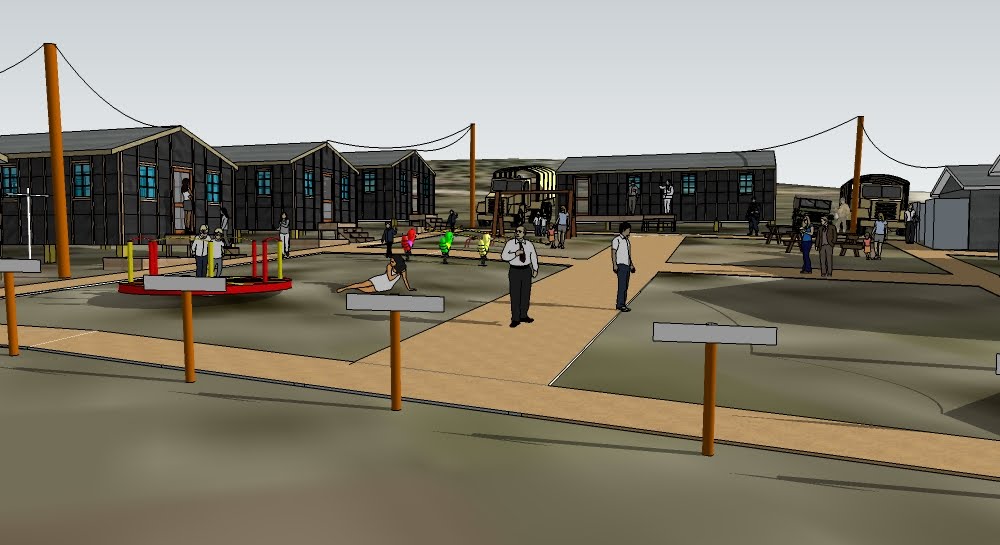
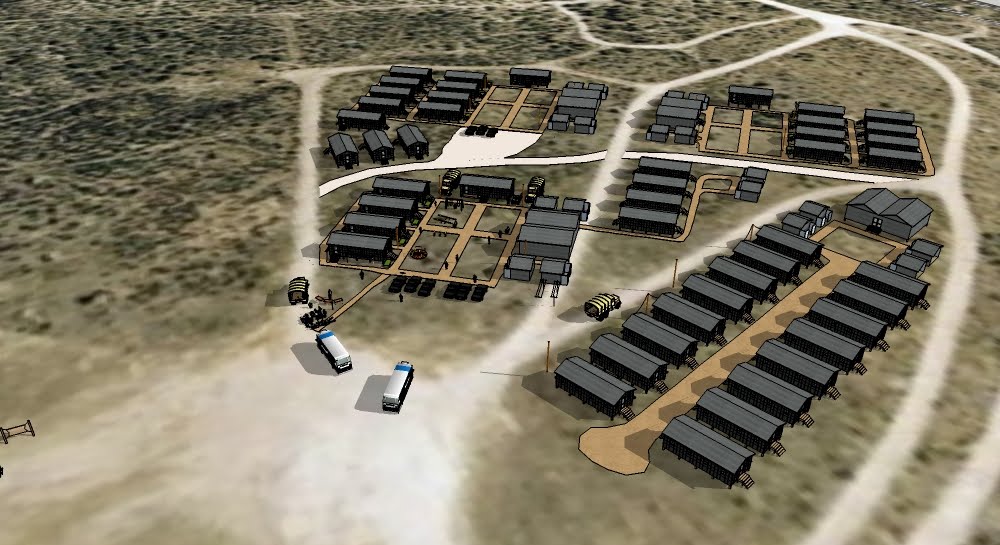
For one episode, we had to create an internment camp similar to Manzanar. We had three days to do the design and drawings and eight days to build it. After it was shot, the construction crew and painters had 14 hours to add 45 years of age. The Production Designer Ruth Ammon gave me sketches of what she wanted as she was leaving for the location scout of the build site. I asked her to send me the GPS coordinates of the center of the camp and a photo showing the orientation. By the time they got back from the scout I had downloaded the site with the topography from Google Earth, dropped the camp model onto it and laid in the new road. It saved me at least two days.


SketchUp model of camp for "Heroes"
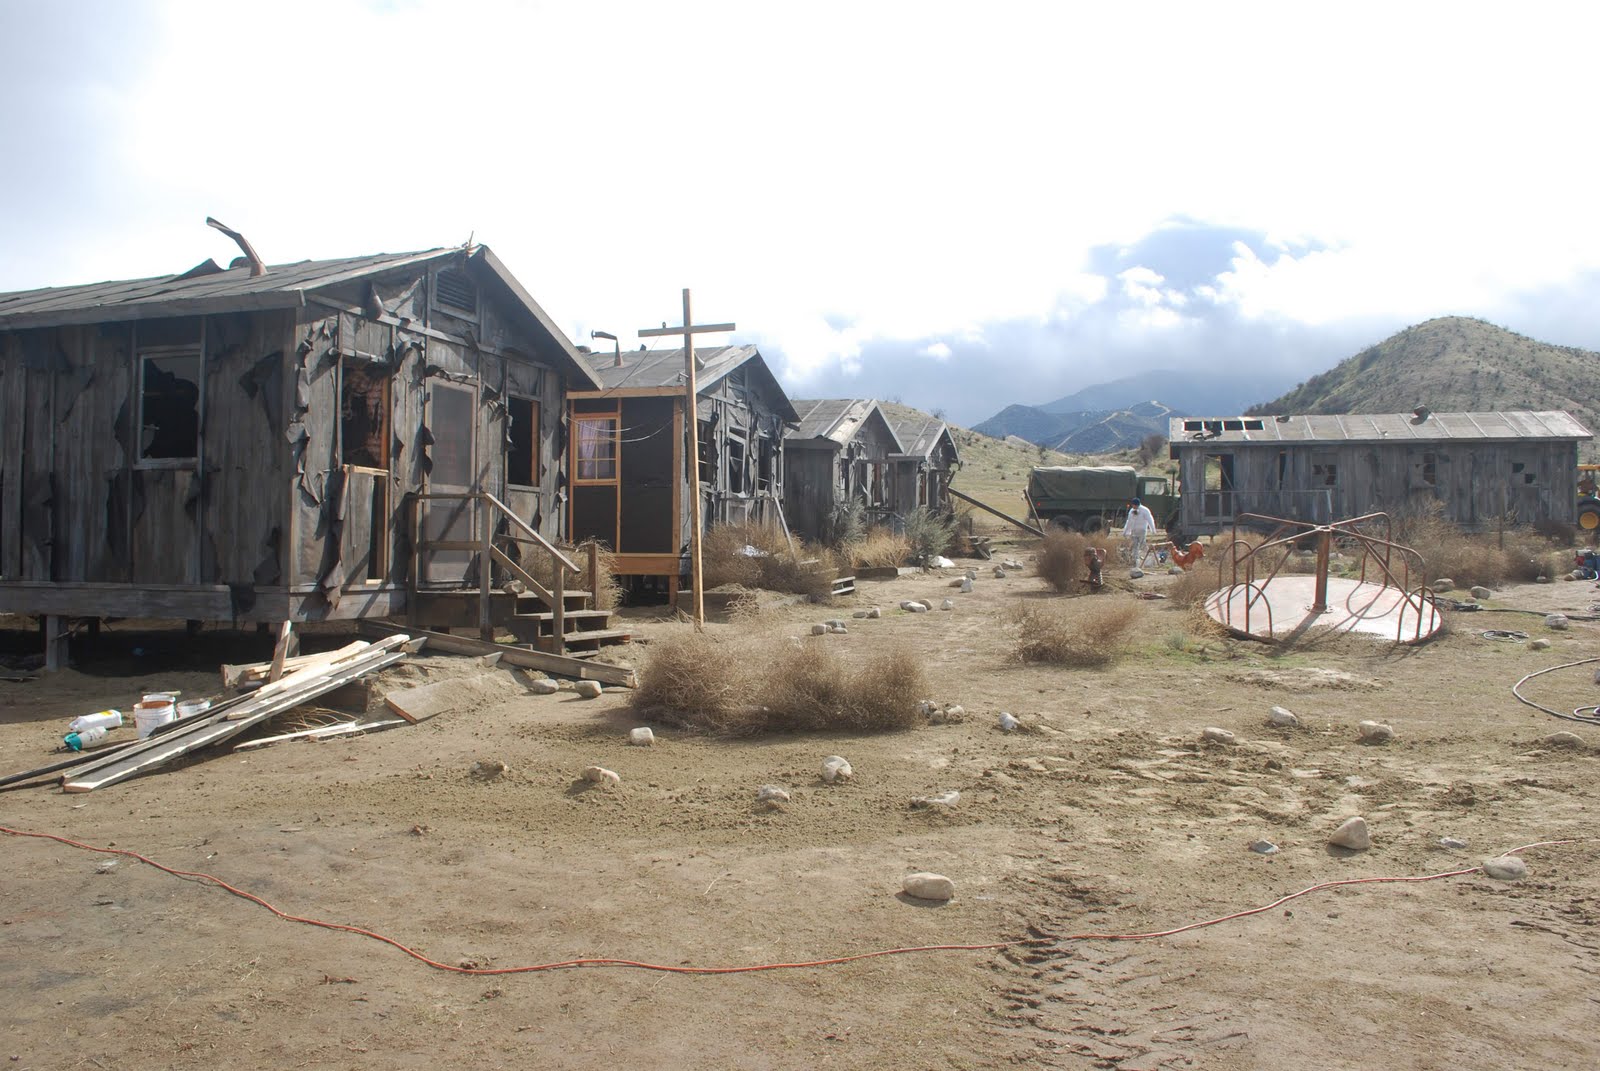
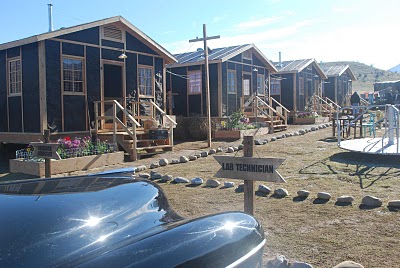
Finished camp

Camp after being "aged" 45 years

The program is also great for designing photo backings or translites for stage work.
We used to lay them out on paper but doing them in SketchUp is great because there isn’t any guess work. You can "paint" the photos of the location on the wall outside the model at the right scale and show the Production Designer exactly what it will look like.

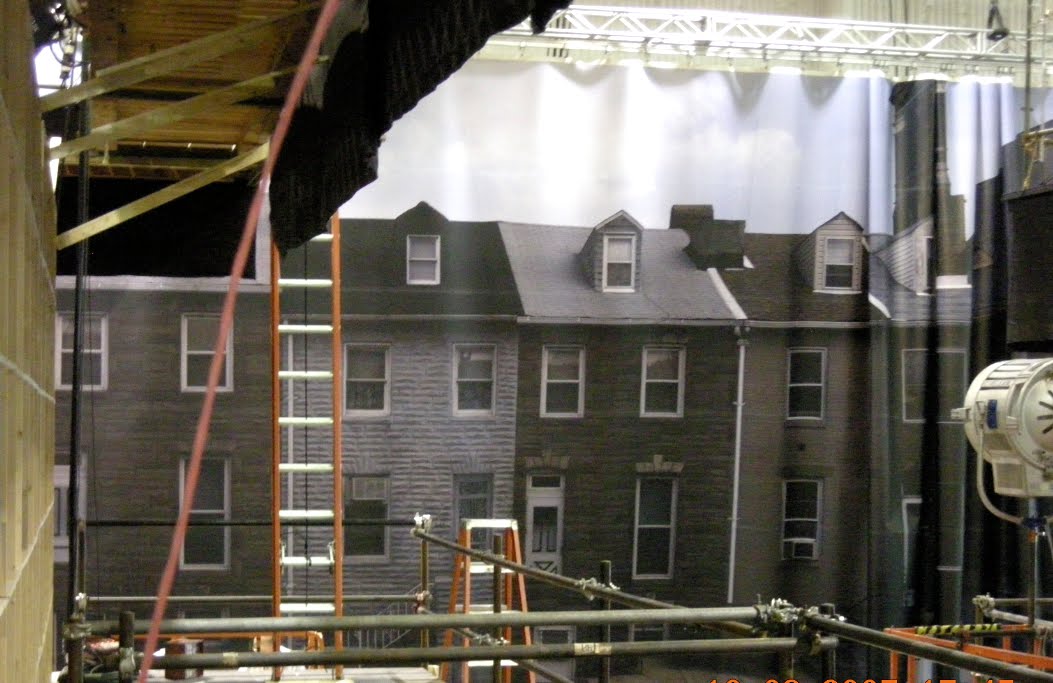
A layout for a photo backing.

The finished translite when hung on the stage

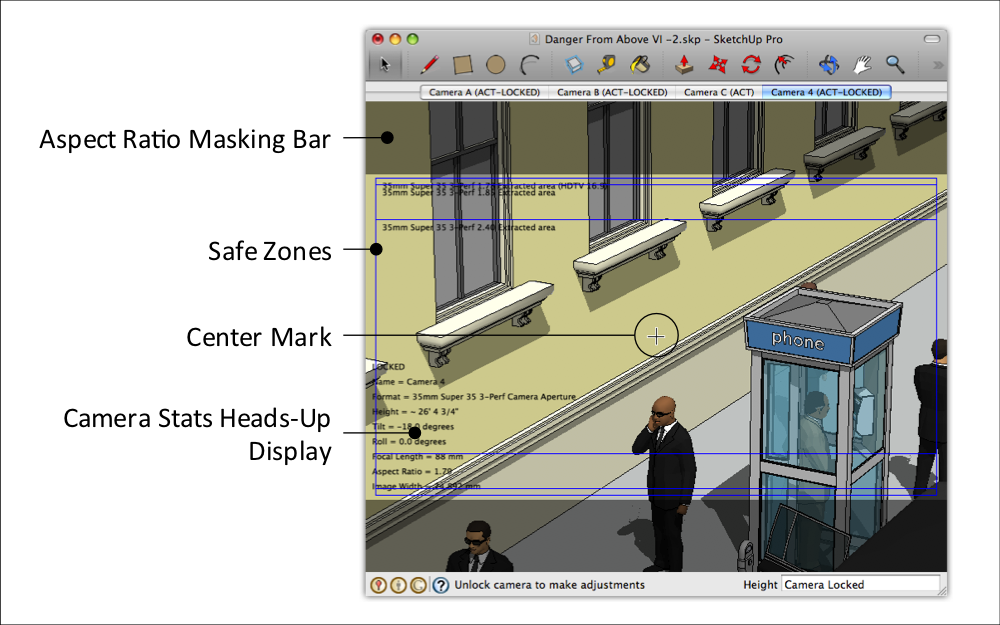
How are you using the Advanced Camera Tools plugin in your work?

I’ve been hoping for an update to the old Film & Stage plugin for some time now and was really excited to learn Google was working on it. It really was the missing piece of the package for me. I can now say that SketchUp really is the perfect software for film design. There is very little I can think of that I can’t do with it.

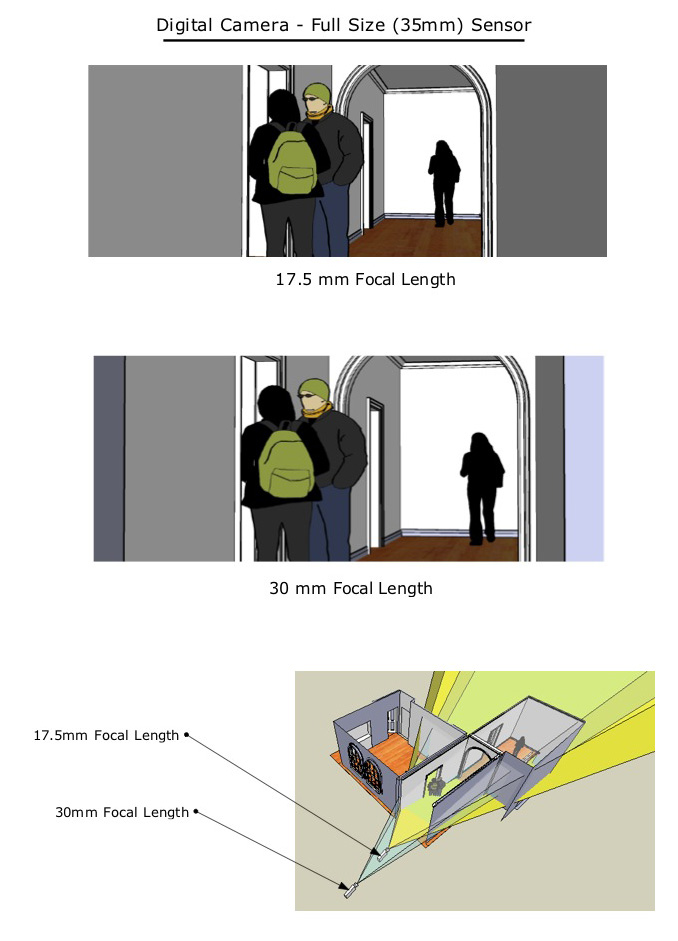
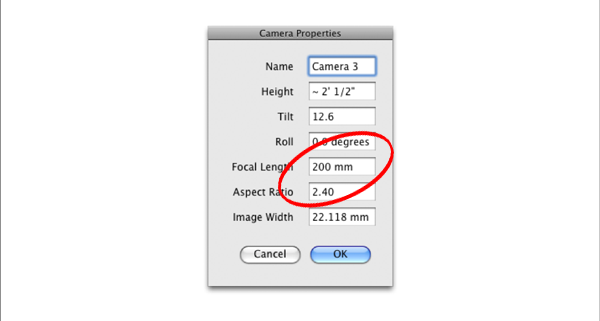
When you have a digital model up on the screen, the first thing a Production Designer or Director or DP will ask is, “What focal length is that?” Because the most important thing really is: What is the camera going to see? Everything else for us is secondary. If it can’t be shot it won’t work.

I had a work-around process for using camera angles that I’ve been using but it’s cumbersome. The new Advanced Camera Tools plugin is fantastic. I can change the focal length while in the camera mode and not have the camera move its current position, or I can change the aspect ratio or tilt or height without having to reposition anything. And having the data right on the screen is a big help.

This means SketchUp is now very useful for the other two "VIS's". In the industry, visualization is now broken up into three parts: D-VIZ (Design Visualization), PRE-VIZ and POST-VIZ. D-VIZ is the traditional pre-production design phase where the sets and environments are created and SketchUp is already the most-used modeling program in that respect.

Pre- and Post-visualization are more concerned with exactly what is seen through the camera and combining real and computer-generated elements. With the Advanced Camera Tools, you can now view a model and be very specific as to camera position, aspect ratio and lens focal length. That for me was the missing piece of the software.

What advantages does it give you over other similar programs?

For a software package that would give you the same ability to use specific camera data and lens data you would have to consider a much more expensive program. To get data and camera control comparable to the new Advanced Camera Tools I would have had to bring the model into another program such as Maya or Rhino. Now I don’t need to go to that trouble.

It also suddenly becomes a very much more useful tool for storyboarding. There are a number of programs such as Frame Forger that are popular 3D storyboarding programs because they provide specific camera and lens data. You now have all those capabilities with SketchUp. And when you create those boards in LayOut, they are automatically updated when there are changes to the model. That’s a huge advantage.

I’m going to begin teaching seminars on Visualization For Filmmakers (email if you're interested) here in Los Angeles and almost all of the curriculum has been created in SketchUp or LayOut. The ACT plugin will be very useful for the sections when I’ll talk about both lenses and digital storyboarding.

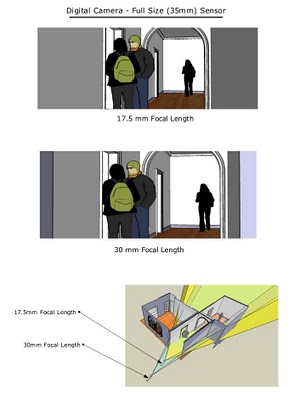
Focal length comparison diagram

What would advice would you give to aspiring set designers and filmmakers?

I always recommend that people who want to direct take an acting class such as the Judith Weston Acting Studio, which is excellent. You’ll have more empathy for actors and it will be easier to communicate with them. Even if you want to make animated films or create CG characters, understanding the acting process and character development will make your digital characters more emotionally real. Learn about what the camera does. The book "Film Directing: Shot by Shot: Visualizing from Concept to Screen" is a good resource, as is "Digital Moviemaking 3.0".

Make short films. You used to have to go to film school just to have access to the equipment you needed to make a good looking film but not anymore. Today, all the equipment you need to shoot and edit in your own home is affordable.

Traditionally, Production Designers got their start as Art Directors or Set Designers, but now they come from all fields: illustration, product design, visual effects and others. The Art Directors Guild publishes a magazine called Perspective which is available online and contains articles about the design of current films. You’ll need to be able to communicate visually, which means drawing and modeling are both very useful skills as well as the ability to read architectural drawings. Study architecture, design, history, technology. There’s nothing you’ll learn that won’t be useful. The Production Designer, to be really effective, should know the basics about all the other aspects of film making.

Permalink | Links to this post | 9 comments

Introducing the Advanced Camera Tools

From the looks of it, we’re taking Hollywood by storm.

It seems that every time I watch a movie’s special features, up pops SketchUp: How’d they figure out the Penrose stairs in Inception? What did a vehicle designer for Avatar use to invent the bad guys’ robot suits? What tool did the production designer for 300 and Good Night, and Good Luck use? The set design for The Social Network? Futuristic environments for Tron: Legacy? The sheer number of films and TV shows that SketchUp’s been a part of is jaw-dropping—and we couldn’t be happier about it.

Since the entertainment industry’s been so good to us, we thought we’d return the favor. The old Film & Stage plugin we built in 2005 has been languishing in quasi-supported limbo for years. We dug it out of the shed, took it all apart, fixed the broken stuff, then... strapped a rocket to its butt. If fact, we made it so much better that we had to give it a new name.

The Advanced Camera Tools plugin lets you work with real-world cameras in your SketchUp Pro 8 models. Cameras you create with the ACTs provide precise controls for settings like Focal Length, Aspect Ratio and Image Width, which allows you to accurately preview real camera shots right inside SketchUp.

We put together a little video that tells the story succinctly:


In words and pictures, here’s some of what you can do with the Advanced Camera Tools:

Place cameras in your model and look through them to preview your shots.


Choose from dozens of pre-configured camera types, or create your own.


Position and aim your ACT cameras using familiar moves like Pan, Tilt, Roll, Dolly, Truck and Pedestal.


Set the Focal Length of any camera to simulate a large number of physical lenses.


Look through your ACT cameras to preview Aspect Ratio and Safe Zones for the shots you’re planning.


Toggle on and off all of your ACT cameras’ frustums to clearly see what is—and isn’t— visible in your shots.

The Advanced Camera Tools work on both Windows and Mac computers running SketchUp Pro 8. The plugin itself is a free download; you can get it here: Windows | Mac OS X

This Getting Started Guide is a good place to look for answers to your questions. To join a discussion, check out this thread on our forums.

Six years ago, we also released a big collection of components that relate specifically to film and tv production. If you need a dolly or a jib or a light stand or a light or a scissor lift or any other piece of movie set apparatus, this collection of collections on the 3D Warehouse is a great place to start looking.

One more thing: The lion’s share of credit for getting these tools out the door goes to Brian Brown. He worked on them in his 20% time—his day job is leading the engineering effort for Building Maker and the 3D Warehouse. Small tokens of appreciation (RED ONE HD cameras, etc.) should be mailed directly to him.

Happy pre-visualizationing!

Permalink | Links to this post | 21 comments

SU + SXSW

The annual South by Southwest (SXSW) conference in Austin, Texas kicked off today, and for the first time Google SketchUp will be in attendance. We’ll be showing off some exciting new things we’ve been working on, so come find us on the tradeshow floor Monday through Thursday at booth 1322 alongside the rest of the Google crew.

We’re also hosting a party with the Blogger team at Six Lounge on Monday, March 14th. Artists Justin Chin and Sunil Pant will also be on hand; they’ll be live-modeling a futuristic skyline for the city of Austin. There will be also free food and drink (just in case you’re into that sort of thing). And if you come visit us at the tradeshow on Monday, we just might have some VIP invites to the party lying around for folks who mention this blog post. So stop by, partake of our booze and sweetmeats and see some talented SketchUppers do their thing. Doors open at 7 pm, so come early and avoid the lines. Please spread the word, and we’ll see you in Austin! Posted by Gopal Shah, Product Marketing Manager

Permalink | Links to this post | 1 comments

New SketchUp 8 books from Bonnie Roskes

The shelf of books about SketchUp 8 is getting heavier, I’m happy to say. Bonnie Roskes is the author of the very first SketchUp book, and has now also written the most recent. In fact, no one’s written more publications about SketchUp; if you count her excellent books for kids and educators, there are dozens. I honestly don’t know how she does it.

A lineup of Bonnie Roskes' newest books

Bonnie’s latest additions to my library include:

  • An update to her popular “Hands On” series that covers version 8
  • A revised edition of her Student Workbook
  • A Delta book to fill you in on the differences between SketchUp 7 and 8
  • An overhauled tome about LayOut 3

All of Bonnie’s books are available as PDFs or printed copies, and they're all for sale on her 3DVinci website. For students and teachers, she also has a Project of the Month subscription where three fresh, hot projects are delivered monthly to your inbox. I never miss ‘em.

Congrats on your new books, Bonnie. And if you get the chance, do you think I might be able to borrow the keys to the time machine I assume you have parked in your garage?

Permalink | Links to this post | 0 comments

Rebuilding L’Aquila in 3D: Progress

In mid-January of this year, we returned to l’Aquila, Italy to teach a Google Building Maker workshop, in further support of the post-earthquake 3D digital reconstruction effort of the city. If you are not familiar with this Google-assisted effort, you can read all about it (or just watch the video below).


While we were there, we had the chance to meet many users that are actively working on the project, and see several of their amazing models. These models allow an “at-a-glance” look at the current situation of the city. Most of the models reproduce the city as it is now, including the damage to the various structures; they provide a precious resource to evaluate current and future reconstruction projects in the city.

Modeling Progress: On the left are geo-models that existed before the Google workshops. On the right are models currently visible in Google Earth.

SketchUp model and picture (inset) of the S. Pietro di Coppito (XIII century) after the earthquake.

SketchUp model and picture (inset) of Santa Maria del Suffragio (XVIII century) after the earthquake.

If you are interested in lending a hand, you can use Building Maker to create simple geo-models. If you’d like to dive in a little deeper, you can use SketchUp in connection with the many photos and other information on the project website.

Permalink | Links to this post | 0 comments