
As you may have noticed, the Google SketchUp blog looks a lot different today. That’s because we—along with a few other Google blogs—are trying out a new set of Blogger templates called Dynamic Views.
Launched today, Dynamic Views is a unique browsing experience that makes it easier and faster for readers to explore blogs in interactive ways. We’re using the Magazine view, but you can also preview this blog in any of the other six new views by using the view selection bar at the top left of the screen.
We’re eager to hear what you think about the new Dynamic Views. You can submit feedback using the “Send feedback” link on the bottom right of this page, or visit our discussion group.
If you like what you see here, and we hope you do, we encourage you to try out the new look(s) on your own blog—read the Blogger Buzz post for more info.
Trying on the new Dynamic Views from Blogger
Tuesday, September 27, 2011 4:10 PM
SketchUp Case Study: André Silva
Friday, September 23, 2011 5:15 PM
This case study comes to us from André Silva. André is a freelancer in Lisbon, Portugal who mainly works on industrial projects and technical illustrations. He’s also currently working on some architecture and archaeology projects.
I was first introduced to SketchUp about three years ago, while I was searching for simple software to model mechanical devices in 3D. My first contact with it was not very promising and I felt a bit skeptical about its real possibilities to build good mechanical models -- mainly because it seemed to be a software intended to build models for Google Earth.

However, after some days of training, I became really surprised with how easy and fast someone can model almost anything with this software. As an example of simplicity, a chain link which took me about 4 hours to model with "Mechanical Desktop" (an Autodesk application that I was using then), was done only in 50 minutes with SketchUp.

Of course, there are important differences between these softwares: SketchUp is not a CAD software, but I believe that when the problems you have to solve are simple you must always look for a simple solution and for what I need to produce in my work, SketchUp is without a doubt, the best solution.


Since those days, I'm modeling with SketchUp on a daily basis, not only to produce schemes and 3D model views for technical documents (usually for parts lists and exploded views) but also as an important helper in the development of small mechanical projects. Basic analysis about interference between machine parts or assembly sequence studies are easy with SketchUp.

A good and recent example of how SketchUp helps me in my work is the set of studies and schemes I made for a simple lifting adaptor for copper cylinders. This was a simple project entirely developed with SketchUp since the first sketch, up to the final product. All presentation and assembly schemes, and even a presentation video, were made easily and rapidly with SketchUp.


Some time ago I also started to use SketchUp in another way: as a pre-modeling tool for some architectural or "inorganic" models in Blender. Working this way dramatically simplifies the modeling work with Blender and I think is a technique that I will keep exploring.

In my humble opinion and to conclude this note, I only find one "problem" with SketchUp: the non-existence of a dedicated version for Linux. But what can we do? We all know that the world is not a perfect place.
Editor’s Note: Some Linux users have had success running the Windows version of SketchUp on Wine. The Wine Wiki provides more information.
SketchUp Pro Case Study: Dave Richards
Monday, September 19, 2011 3:32 PM
Dave Richards is fine woodworker living in Rochester, Minnesota. By day, he maintains critical life support equipment in the Anesthesia Department at the Mayo Clinic. By night, he’s a an authorized SketchUp trainer/rockstar, contributing and teaching on the popular blog Design. Click. Build. on finewoodworking.com and the SketchUcation forums. His work has been published in Fine Woodworking magazine, and Dave is considered by many as a foremost expert on using SketchUp for woodworking. He sat down to chat with us recently. Here’s what he had to say:
How do you use SketchUp?
SketchUp is my “go to” application for woodworking. I draw all of my projects using SketchUp Pro. In fact, I really have no need for any other design application. I can work at higher precision than is needed in woodworking and I can draw everything I need with it.

Typically, I draw plans for projects so that other woodworkers can build them. Some of these projects also involve some design work and collaboration with clients while other projects involve creating plans for existing pieces of furniture. I’ve also found SketchUp useful for making detailed drawings of machines for exploded views and instructional manuals.
Have you worked on any projects that folks might have heard about?
Woodworkers who are familiar with Fine Woodworking Magazine might recognize a number of the projects I’ve worked on because they are almost always tied to articles that run in the magazine. Examples of these are an Arts and Crafts Display Case designed by Michael Pekovich and several Shaker style pieces by Christian Becksvoort.

Two Shaker Tables designed and built by Christian Becksvoort [Credit: Fine Woodworking Magazine]
Which of your projects are you most proud of?
I’m probably most proud of the Arts and Crafts Display Case drawings as well as drawings for a work bench designed by Garrett Hack. In both cases, my SketchUp drawings were used as renders accompanying the magazine articles as well as for complete plan documentation.


What was your reaction the first time you used it?
I first heard about SketchUp on a woodworking forum back in the days of @Last Software. Before I downloaded the trial version of SketchUp Pro, I spent a long time looking at the videos that were available on the @Last website. I read the old forum looking at what others were doing. Finally I decided to give it a try. I was very pleased that I could quickly create a 3D perspective view of a real object with accurate dimensions. It was much easier than the CAD programs I tried and I was hooked. It didn’t take the full eight-hour trial period to decide I would buy it.

The biggest hurdle was convincing my wife that the $495 would be well-spent! I spent about that much for my tablesaw. I realized that SketchUp Pro would qualify as another big tool for my shop. At that time I had no idea I would be using it the way I do now.
Do you use any other tools in cooperation with SketchUp?
I use LayOut to create the plan documentation from the SketchUp model. This is a key part of the process for me. I also use Microsoft Excel and Word to deal with CSV files that are created for cut lists generated by the Cut List plugin. Some of the images I create need a little post processing and for that work I use PhotoShop and a freeware application called Paint.NET.
I’ve also gotten a lot of use out of Style Builder to make my own sketchy line styles. It seems like Style Builder is an under-utilized tool but I find it is very simple to create and edit line styles with it.

That old adage about a picture being worth a thousand words is definitely true and I frequently find times when it is easier to make a point or communicate an idea with a quick sketch done in SketchUp than to type out paragraphs of description.
We'd like to thank Dave for taking the time to talk with us. You can see even more of his SketchUp work here.
Posted by Gopal Shah, SketchUp marketing
Free training webinars about 3D printing from Ponoko
10:10 AM
Just a heads up: The good people over at Ponoko are planning to hold an Online Training Extravaganza to get newbies up and running with their "personal factory" workflow. If you're interested in 3D printing, laser cutting or CNC routing, this is for you. They're giving discounts on their services just for registering. And since it's online, you don't even have to change out of your pajamas to attend. Bonus!
Two of the 3D printing presentations focus on using SketchUp; they're free, but you need to register beforehand. They're currently scheduled for:
- Tuesday, September 20th at 3pm Pacific Time | Register
- Tuesday, October 4th at 3pm Pacific Time | Register
The sessions on laser cutting and CNC routing both use Adobe Illustrator, but that's alright -- SketchUp Pro can export to DXF and DWG, both of which open beautifully in Illustrator. Scroll down to the bottom of the page to see all the sessions.
Just in case you missed it, here's a SketchUp & Personal Fabrication overview we put together a few months ago.
Scaling imported raster images in LayOut
Wednesday, September 14, 2011 5:05 PM
If you’ve ever inserted an aerial photo or an old scanned site plan into LayOut, you might have wanted to give it a specific scale on the page. My favorite technique for doing this uses the Clipping Mask feature.
Step 1
Choose File > Insert... to insert a raster image into your LayOut document. Find a known measurement somewhere on your image. This known measurement can be anything: a scale bar (if you’re lucky); the length of a fence or sidewalk; or even the roofline of a building. It’s important that you find something that’s relatively large and that whose length you already know. You’ll use this portion of the image as a “benchmark” to size the entire image to a specific scale.
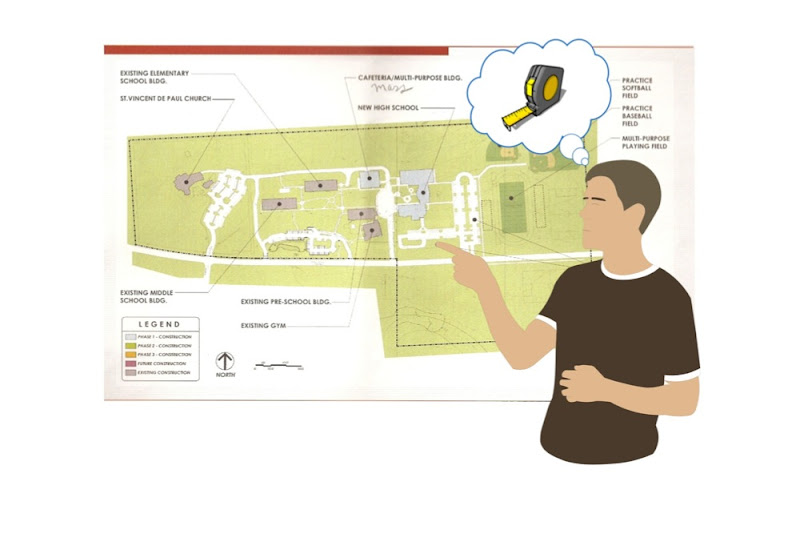 In my example, a scale bar was included in my image; this makes it pretty easy to use as a benchmark.
Step 2
Figure out what scale you’d like to give your inserted image. Keep in mind how the scale will impact the size of the image and how that image will fit on your page.
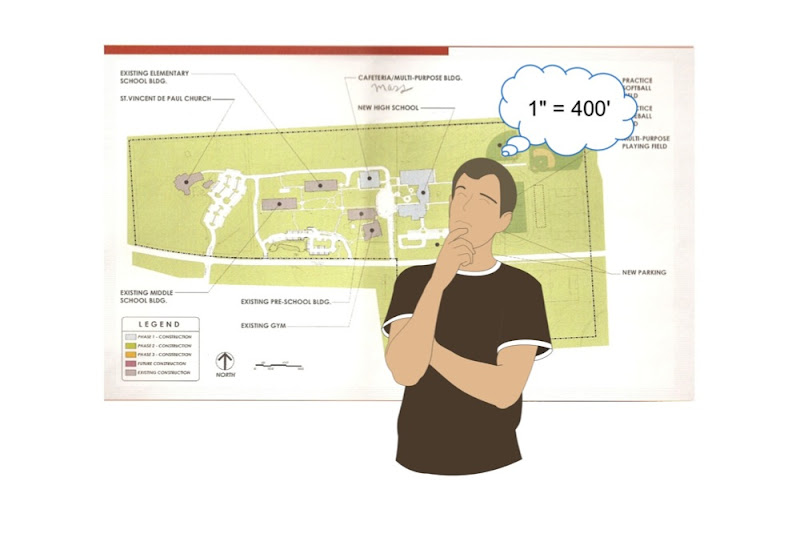 For this image, I’m going to use 1” = 400’ (1:48) scale. This should fit nicely on an 8.5 x 11 sheet of paper.
Step 3
Create a rectangle around the “benchmark” portion of your image. Use the Rectangle tool to do this, and make sure it has no fill (so that you can see through it.)
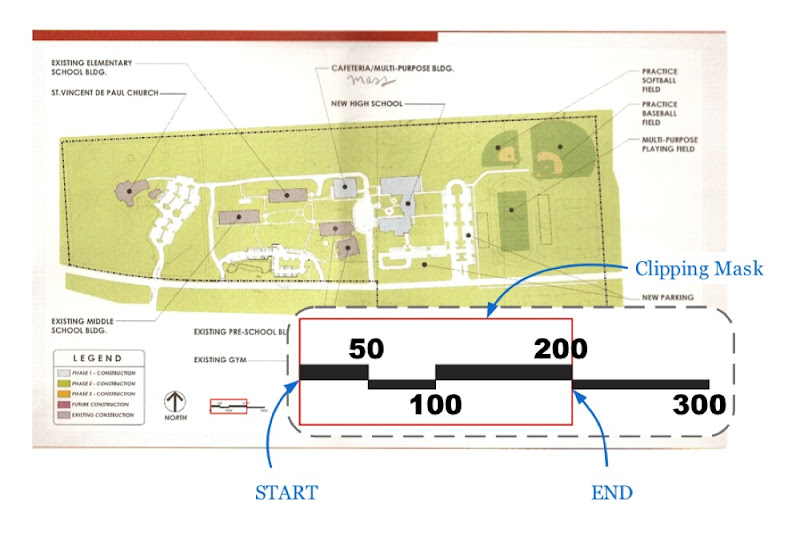 This scale bar only goes to 300’, so I’m going to use the 0’ - 200’ as my benchmark. 200 is half of 400, which makes the mental math easier to do.
Step 4
Select both your rectangle and your image and choose Edit > Create Clipping Mask. Select the resulting crop and give it a visible stroke so you can see its boundary.
 I color the clipping mask to make its border easier to see.
Step 5
Somewhere on your page, use the Line tool to draw a line whose length corresponds to the scale of the image you’re working on.
To draw a line, click to start drawing, move your cursor in the direction you want the line to go, type the length you want and hit Enter.
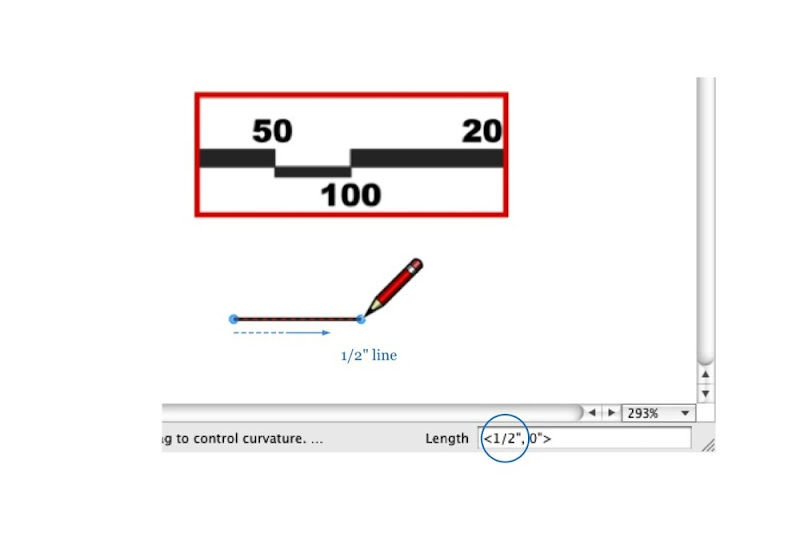 Since I want a scale of 1” = 400’, and my “benchmark” is 200’ feet long, I draw a horizontal line which is one-half inch long (1 inch divided by 2).
Step 6
Move your benchmark, snapping its lower-left corner to the left endpoint of your line. Be sure that Object Snap (Arrange > Object Snap) is turned on, or snapping won’t work properly.
 I snap my benchmark to the left endpoint of my line.
Step 7
Scale your benchmark so that it’s the same length as the line. With your benchmark selected, hold down the Shift key and scale it until it snaps to the right endpoint of your line. As long as you hold down Shift, your selection should scale proportionately.
 I scale my benchmark to the right until it aligns and snaps to the end of my line.
Step 8
Select the benchmark and choose Edit > Release Clipping Mask. Delete the rectangle from Step 3, and the line you drew in Step 5, and you’re done. Voilà! You’ve set your image to a specific scale.
 Image set at 1” = 400’ (1:48) scale and positioned on a letter-sized landscape sheet.
This may seem like a lot of steps but it’s actually pretty simple. Have a look at the following silent movie to see how it’s done.
FormFonts has a new blog
Thursday, September 8, 2011 4:55 PM

The über-modelers over at FormFonts have just launched a new blog. From the looks of it, the content is fresh, relevant and nicely varied. Some of my favorite recent posts:
- Convert a SketchUp 3D Model to Revit
- Who is Master 3D Modeler Alan Fraser?
- Make a Cookie Barn Using SketchUp and Flour
- Who is Artist Extraordinaire Gabriel Concha?
This post (their first one) talks a little bit about the history of FormFonts. Well worth the read. Welcome to the blogosphere, FF!
Shaderlight V2 is now available
Wednesday, September 7, 2011 12:01 PM
Our friends across the pond at Shaderlight would very much like you to know that they’ve just released Version 2 of their intuitive, affordable rendering tool for SketchUp. I’m no rendering guru, and I certainly haven’t tried all the alternatives, but I can truthfully say that Shaderlight is responsible for the only successful photo-realistic rendering I’ve ever made. That (and a soupçon of Photoshop) resulted in the following less-than-masterful example of stunning SketchUp realism:


The important things to note are that a) I’d never rendered a 3D model before, and b) this only took me a couple of hours to figure out. Photo-realistic rendering is still far from easy, but Shaderlight gives dopes like me a fighting chance.
The newest version of Shaderlight includes two major new features. The first is something called Replace Me. It lets you model with low-poly “proxy” objects, but then specify deliciously high-poly substitutes that Shaderlight uses when it renders. You get the best of both worlds: speedy performance in the model and better realism in the render.
The other new hotness is Rendered Animations. Shaderlight can use SketchUp’s scene-based animation settings to automatically create a photo-rendered video. Too cool. Congrats to the team at ArtVPS on getting this update out the door. It looks great.
Until the end of September, new customers can save 25% on Shaderlight Pro licenses. The promo code to use at checkout is 09PROMO.
Visualizing circuit boards with SketchUp and the PCB Converter
Tuesday, September 6, 2011 12:19 PM
In the world of electronics, designing a stylish, functional and ergonomic product casing around a complex circuit board—with its chips, connectors, buttons and displays—is a critical step. As it turns out, SketchUp can help in this process.
Recently, RS Components (Europe's leading high-service distributor of electronic components) developed the PCB Converter plugin for SketchUp. Its function is to convert IDF files from most 2D circuit board design applications (like their own DesignSpark PCB) to COLLADA, which SketchUp can read and write.
 The PCB Converter plugin converts IDF v3.0 circuit files into COLLADA that can be brought into SketchUp to validate for proper fitting.
Mark Cundle of RS Components was good enough to help explain how the PCB Converter can help in the design process:
In the typical electronic product design process, the mechanical engineer defines the board shape, specifies important regions and pre-places critical components such as connectors, switches and displays in a 3D MCAD system. This information is passed to the circuit designer via an IDF file to be used as the basis for the board layout in a 2D ECAD system to create the circuit board (PCB) design. The PCB is sent back to the mechanical engineer as an IDF file to ensure the board assembly fits into the final product package. The design can go back and forth between the mechanical engineer and the circuit designer many times until the PCB is finalized.
IDF is therefore extremely important for electronic product design and becoming more so as increasing miniaturisation of electronic products means spatial constraints are of growing importance and the link between electronic and mechanical engineers strengthens.
An electronic (PCB) engineer using SketchUp in conjunction with the PCB Converter for SketchUp can decrease the number of time-consuming interactions with the mechanical engineer by doing a much of the groundwork (such as checking potential collisions with mechanical components) before sending the final board design to the mechanical engineer. The collaborative process becomes much more efficient and productive for both parties, which allows for faster development.
RC Components’ intention is to lower the monetary barrier to innovation by providing tools like PCB Converter and DesignSpark PCB. Hobbyists, students and seasoned professionals can create products from board design through to mechanical design at little or no cost.
A treasure trove of textures
Sunday, September 4, 2011 12:25 PM
If you’re into such noble pursuits as geo-modeling or photo-realistic rendering, there’s a good chance that you spend a ridiculous amount of time hunting for photo-textures online. Flickr and other photo sharing sites are goldmines for content, but who has time to compile a folder of bookmarks that point to the best ones?
Our friend John Pacyga, apparently. He’s just posted a long list of his favorite texture sources — for both SketchUp and Photoshop. Some are free, some have Creative Commons licenses, and some cost money, but all are worth browsing. Set aside some time, though; this kind of thing is addictive.
If you’ve found a seamless texture (one that can repeat attractively when you paint it on a surface), here’s how you load it into SketchUp:
Instructions for Windows:


Instructions for Mac:


I found the rock texture in the screenshots above on lee.ponzu’s Flickr Textures set. Want to make your own seamless texture images? These tutorials on YouTube are a good place to start.
