Follow Me: The Hard Way
In most cases, the wrong way to use Follow Me is to activate the tool, click the face you want to extrude, and attempt to drag it along a set of edges. For complicated extrusion paths, this can be painfully inefficient.
Follow Me: The Right Way
Next time you need to extrude a face along a path, use Follow Me this way:
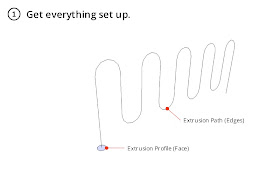
- Make sure your extrusion profile (a face) and your extrusion path (one or more edges) are set up the way you want them to be.
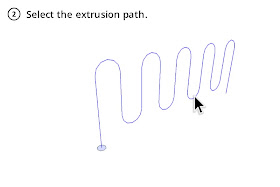
- Select (with the Select Tool) the edges that make up the extrusion path you want to use.
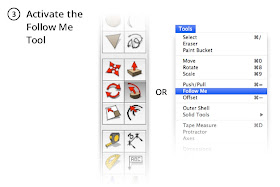
- Activate the Follow Me Tool by clicking its icon or choosing Tools > Follow Me. When you active Follow Me, the edges you selected in Step 2 will appear to deselect; they won't be highlighted anymore. Don't worry, though -- they're still selected.
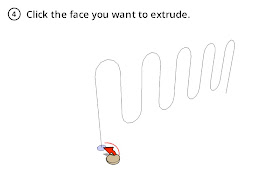
- Click (with the Follow Me Tool) the face you want to extrude.
- Everything happens in a flash. Voilà!
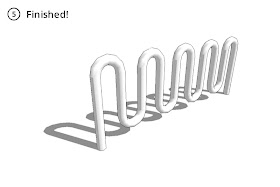
That’s all there is to it. You can take your time selecting exactly the edges you want. You can orbit, zoom and pan in order to select a complex three-dimensional path. No more cussing and sweating while you try to get the extrusion to go exactly where you want it to. Sometimes a little knowledge can save a lot of headache.

I use this method, and it is much easier to use than the "find an edge as you go" method.
ReplyDeleteHowever, as your images show, this better method can be confusing to users. After you select the edges you want, and then activate the Follow Me Tool, your edges become visually UN-selected! This is not too user-friendly for a new user to see that their hard-earned selection has just been reset! (Well, it hasn't been reset, it just looks that way.)
Perhaps the tool can be improved to either not reset the selection, or, otherwise highlight the selection so the user gets visual feedback they didn't just screw up?
This is a fantastic and time saving tool for the things I use it for, like running mouldings around a room or piece of furniture.
I wonder what the trick is for spiral staircases would be? Ive alwaysbeen stuckin trying to use follow me for the handrails but always end up with a screwed railing. Any ideas?
ReplyDeleteThis comment has been removed by the author.
ReplyDelete1001bit pro Archictural tools...
ReplyDeleteWe have been using this tool for a few years now...
http://www.riasolutions.biz/#/1001bit-pro-standard-tools/4543495011
EXRUDE ALONG SLOPING CURVED PATH
This tool is specially meant for extruding a profile along a sloping curved path;
for example,car park ramp, railing of spiral staircase, etc. The tool will maintain vertical profile along the slope.
With the fact that modelling accurately in detail is what many designers seek to perfect, i think the follow me tool needs to maintain its vertical profile when following along rising, twisting paths but it does not support this hence using an alternative offers this.
Hello,
ReplyDeleteTo model handrails it's also possible to use Chris Fullmer Shape Bender plugin : http://www.sketchucation.com/forums/viewtopic.php?f=323&t=18210&sid=5a771c7e5878c0c3948f463030aaeba1
It works like a charm ! Thank you Chris Fullmer !
Regards,
Jean-Luc
I wonder what the trick is for spiral staircases would be? Ive alwaysbeen stuckin trying to use follow me for the handrails but always end up with a screwed railing. Any ideas?
ReplyDeleteSP LIBRARY
Hello Friends! Here is the nice tutorial on Spiral Stair Case. http://www.sketchup-ur-space.com/march11/Create-a-spiral-staircase-Step-by-step.htm. Hope that you folks will get proper help from here.
ReplyDeleteVery nice villa. You can also visit our site if you want to discover more Pattaya villas.
ReplyDeleteService rent property in pattaya | Pattaya Appartments properties
Fine, But...
ReplyDeleteIf you know everyone has misunderstood the followme tol, maybe you would concider to make the tool diffrent. You say in step 2, you select the path but you cant se its selected???
Maybe thats a good start, let us se what we select.
Thanks
Pete
great.....
ReplyDeletemy question is same as Shubhransu...
is it work for spiral staircase?
any ideas?
I use this method for creating borders on surfaces like a table top. It is easy to get the path, even complex ones, by double clicking on the surface, which selects the surface and its bounding edges. Then shift click on the surface which deselects the surface. Now you have the entire path of the edge selected. Continue with selecting the follow me tool etc.
ReplyDeleteIt sounds like Sketchup answered it's own question. The problem is not the user didn't understand how to use the Follow me tool. The problem is that in step 2 Sketchup does not clearly communicate that your edges are STILL selected. This is a no brainer to fix and should be included in the next version of Sketchup. Advanced users have "figured" it out, but you would have a lot more "advanced" users if you simply got the user interface correct to begin with.
ReplyDeleteIn response to Shubhransu and Danish, it works very well for a spiral staricase handrail, however there are a few considerarions to prevent you from getting frustrated. First, the method for creating a spiral path to follow is the key to making it work. There are many ways of doing this, but I tend to do it manually, because then I have complete control over the results. I start with a circle and Ctrl-extrude it multiple times based on how detailed I want the spiral. Then I connect a line from the vertex of the bottom circle to the vertex one above and one over from that one... and so on. This creates a spiral that becomes my path.
ReplyDeleteThe second thing to consider is the shape you use to extrude works best if it's a circle. If you have a nonsymmetrical shape, chances are that the shape with twist as it extrudes up the spiral path and will produce a result that will be not what you are look for. If you want to extrude a nonsymmetrical shape up a spiral, that it something that requires a bit a different method to make. Let me know if you are interested in finding out how to do that and I can make up a tutorial to show one method (of many) to do that.
Andrew
I understand how to use the follow me tool by selecting the path, then the tool, then the surface and have used it many times. I have encountered a problem, however, where it does not seem to work. I will have a drawing of a pendant and try to create a jump ring but when I select the path (a half circle) and then the surface (a full circle centered on the endpoint of the path) the surface disappears but the operation seems complete. In fact, if I go into edit, I can undo the operation and again see my surface/path setup. It does not matter if I perform the operation on the pendant or off to the side (planning on moving the jump ring to the pendant). And the manual follow me does not work either. A full (rather than half) jump ring will not work in this situation either.
ReplyDeleteAny suggestions?
Reading this article - The rIght way to Use Follow Me and the accompanying comments has been helpful to this user. Still, I have found one simple but important caveat somehow overlooked by the main article- and one I only discovered by repeated trial and error; both the Profile and the Surface Path MUST be in the same group in order for this tool to work.
ReplyDelete