If you’re reading this, you’re officially missing out on new posts at the SketchUpdate blog’s new home: blog.sketchup.com.
Enter the 3D Printed Lamp Design Challenge
Monday, September 13, 2010
3:05 PM
A couple of us were chatting with our new Belgian friend Martijn Joris a couple of months ago; we were exploring ideas for a follow-up to the World of Houses Design Challenge from earlier this year. What kinds of things might get SketchUp modelers jazzed about the enormous potential of 3D printing? How about, rather than making a scale model of something, producing the thing itself? Architects rarely get to do that, but it’s something we all dream about. At least I know I do.
In that vein, the folks at Materialise (where Martijn works) have just announced the first-ever 3D Printed Lamp Design Challenge for SketchUp. Design a lamp and submit the model; three winners will get their lamp, complete with a base and everything else that makes it work. The grand prize winner also gets a SketchUp Pro 8 license from us. Some images for inspiration:
The competition runs until October 25th of this year. Honestly, I think this is one of the coolest SketchUp challenges to come along in quite a while. As 3D modelers, how often do we get to physically hold the thing we’ve designed? I’m thinking about taking the rest of the month off to work on my entry.
Project Spectrum is something we put together for folks with autism who might be interested in using SketchUp; you can find out all about it on the Project Spectrum micro-site.
Bonnie Roskes (author of the Google SketchUp Cookbook and other publications, parent of a child on the autism spectrum, and all-around neato person) has created a couple of great Project Spectrum-related resources. They’re specific SketchUp activities, available as PDFs at no charge, that anyone can download from her website:
Toy Shop: Collaboration and Communication
In this fun project, a group of students work together to fill an empty toy shop. The students decide among themselves who will be responsible for each toy category. Each student finds his or her models in the 3D Warehouse, then the group comes back together to place their models into the shop. Comments and feedback from each student help foster a collaborative experience.
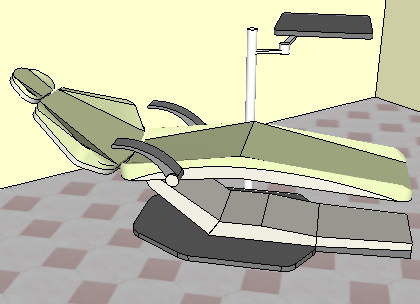
Dentist Office: Relieving Anxiety
Who doesn't get nervous about a trip to the dentist? But "rehearsing" your appointment ahead of time can help make the actual experience easier. It's easy to model the physical spaces using basic rooms, then find the necessary models in the 3D Warehouse. This project shows two ways to "walk through" the model, gives suggestions for conversations about what will happen at the dentist's office, and also shows how to make the experience funny (imagine walking into the examination room and seeing Homer Simpson instead of your dentist.)
Visit Bonnie’s website to download the above activities, and be sure to check out her other offerings, too.
Dick Stada’s story started when he was exploring the Rotterdam marathon in Google Earth. He writes: “I saw skyscrapers appear. It only was a series of white blocks but still spectacular.” Shortly thereafter, he learned that he could create these buildings himself with SketchUp.
Mr. Stada started using SketchUp to model his house in order to plan a renovation: taking detailed measurements of the walls, windows, roof and other components. While he found SketchUp’s user interface to be quite simple, the tools were also extremely powerful. After a few weeks, Mr. Stada had completed a very detailed model -- including textures applied to the sides made from his own photographs.
One of Mr. Stada’s earliest models is also his favorite: John Hejduk's Wall House 2. It took months to complete – he even took pictures of the roof with a kite! It is a unique building with challenging shapes and it is only one block away from his home.
Record some basic measurements (with some help from his kids)
Find the best roof pictures on the Internet
Import the best Google Earth view
Start modeling and prepare the textures
Look for interesting details about the building
Send the owners of the building an email with a link to the finished model in the 3D Warehouse
On the horizon, Mr. Stada plans to work on modeling the southwest part of Groningen NL, focusing on architecturally interesting buildings. Though he and his daughter have started using Google Building Maker in select areas, he prefers to hand-craft his models with SketchUp.
As a systems engineer, Mr. Stada’s interests include spending time with his family, running, cycling, skating, photography and illustration. He considers Google Earth to be “one of the best inventions of the last decade.” Perhaps this is just something in his genes; he is, after all, the son of a geodetic engineer.
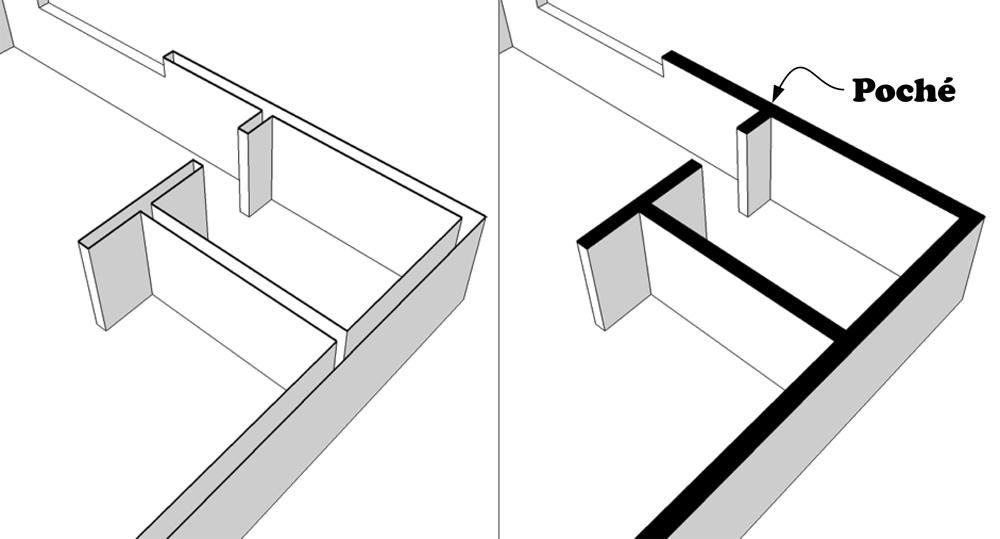
Poché is what architect-types call the filled-in areas of a plan or section drawing. It denotes the parts of a building that are being cut by an imaginary section plane. Here’s what poché sometimes looks like:
Adding a poché (fill) to your section cuts makes your model views more readable.
Plenty of folks would like to add areas of poché to their section cuts in SketchUp; doing so helps to make drawings more readable. Bob Pineo, a licenced architect and überSketchupper from Virginia, just sent us a great little video that explains his technique for adding poché to section cut views. Check it out:
This method involves coloring the inside faces of your walls black (or some other color) so that they appear to have a poché applied. It’s cleverer than using the Create Group from Slice command, since that method is more labor-intensive and needs to be repeated for every new section cut. Bob’s technique works even if you move the Section Plane, which makes it a lot more flexible.
The Google SketchUp team is listening and wants to hear what you have to say about SketchUp 8!
This week at 3D Basecamp, selected SketchUp enthusiasts will gather in Boulder CO, to meet the SketchUp team and discuss all things in nature. One of the perks of attending 3D Basecamp is that users are presented with the opportunity to speak with SketchUp engineers face to face. They can ask their most pressing questions and share their most brilliant ideas for improving SketchUp.
Well guess what? This year, we are happy to announce that there is a way for every SketchUp fan (whether at 3D Basecamp or not) to be heard by the SketchUp team.
Today, we are launching our Google SketchUp Questions and Ideas moderator series where all SketchUp users can post questions and share ideas directly with the SketchUp team. The team is looking to clarify any questions you may have related to SketchUp 8 and is interested in hearing suggestions and ideas for improving SketchUp. We’re interested in hearing all your wildest ideas, so don’t be shy! While you’re on the series, also make sure to vote on other users’ questions and ideas. The SketchUp team will address top submissions publicly at 3D Basecamp and responses will also be posted directly in the series and in subsequent blog posts.
There are a few things to keep in mind when using the series. The series will have two different sections: one for asking questions about SketchUp 8, and one for posting any suggestions or ideas you have for making SketchUp better. Make sure you are posting in the appropriate section. Secondly, Please search for your question or idea FIRST to make sure it hasn’t already been posted. If it has, you should vote for it instead of writing in a duplicate. Also make sure to only submit one question or idea at a time, so it’s clear to your fellow users’ what exactly they are voting on. Following these rules will allow for more accurate voting results, and the SketchUp team will be able to comment on the questions and ideas you really care about.
LayOut 3 (which is part of SketchUp Pro 8) contains a ton of fixes, improvements and other tweaks that make it something you should definitely check out. If you’re already using LayOut 2, the upgrade is a no-brainer; if you’re not a LayOut user yet, it’s probably time to download a trial of SketchUp Pro 8 and take it for a spin.
We introduced four major new features in LayOut 3; they’re intended to make it even easier for you to take care of some (or even all) of your 2D documentation work in SketchUp Pro:
Angular Dimensions
When we introduced regular ol’ linear dimensions in LayOut 2.1 last year, plenty of folks told us they were very, very happy. Being able to dimension orthographic views of their SketchUp models in LayOut meant not having to export to CAD every time they needed a scaled, dimensioned drawing. Neverless, one big thing was missing: being able to annotate angular dimensions.
Using LayOut 3’s new Angular Dimension tool is a five-click procedure. Your first two clicks indicate the direction of the first line; your next two clicks indicate the direction of the second. Your fifth click positions the actual annotation on the page. It’s a flexible system that’s designed to accommodate all kinds of different situations.
Precise Move
One the surface, this feature seems kind of simple; just reposition an object’s center point to give it a custom inference location. In actuality, we created Precise Move in response to a very important – and extremely common – feature request: the ability to more easily position placed SketchUp model views relative to one another on the page.
A bit of background: When we added dimensioning in LayOut 2.1, we also added a nifty little feature called Snap to Point. It let your cursor “see” inference points on placed SketchUp models. All of a sudden, you could snap to endpoints (and other inferences), which in turn made it possible to use your SketchUp model views as the basis for 2D drawings. Dimensioning and Snap to Point made it possible to do 2D drafting in LayOut.
Precise Move (which is new for LayOut 3) makes it possible to take advantage of Snap to Point to, say, line up a plan view with an elevation on the same page. It’s a small thing, but you’ll use it every time you use LayOut to create a set of drawings. Take a look at the video above to see exactly what I’m talking about.
Custom Line Styles
Instead of just adding dozens of new dashed line styles to the menu of ones that are available in the Shape Style dialog box, we figured out a way to let you create what you need with a combination of three simple settings:
Stroke Width: Determines the thickness of the line in pixels.
Dash Pattern: Lets you choose a basic pattern to begin with. Examples are Dash-Dash; Dot-Dot; Dash-Dot; Dash-Dot-Dot — you get the idea. LayOut 3 comes with a dozen basic Dash Patterns you can choose from.
Dashes Scale: By changing the Dashes Scale, you’re changing the length of the dashes, which automatically changes the amount of space there is between them. Each of the dozen Dash Patterns in LayOut 3 has a preset ratio that determines the amount of space between its dashes (or dots.) For example, choosing a setting of 0.5 x shortens the dashes -- and the spaces between them -- to one-half their original length.
CAD Export
You’ve always been able to export a LayOut drawing as a PDF; we added raster export (in the form of PNG and JPG) in LayOut 2. For this version, we decided to throw in DXF/DWG 2010. Lines in placed SketchUp model views that are rendered in Hybrid or Vector mode will export as fully-editable vector geometry. For those who need to generate CAD files for other members of their team, or who might like to add LayOut drafting to their existing multi-tool workflow, this one’s huge.
Feel free to download a trial version of SketchUp Pro 8 (which includes LayOut 3 and scads of other features) from our website.
Every new SketchUp release contains at least one modeling tool that’s guaranteed to save you a ton of time and effort. SketchUp Pro 8 contains five.
The all-new Solid Tools let you perform additive and subtractive modeling tasks (some folks call them Boolean operations) on subsets of your geometry. It’s really not as complicated as it sounds; basically, you use the Solid Tools to generate forms using other forms in your models. You do so by adding them together, subtracting one from the other, and finding the areas that they have in common. Plenty of 3D forms are much easier to make this way – you’ll find uses for them all over the place.
Union takes two or more Solids and combines them into a single form.
Intersect creates a new Solid out of the parts of multiple Solids that overlap.
Subtract uses one Solid as a “cutting object” to remove part of another.
Trim (which is probably the most useful of the bunch) is a lot like Subtract, except that it doesn’t delete the Solid you use as a cutting object. Want to model joinery or other close-fitting parts? Trim is your tool.
Split takes two Solids and turns them into three; it’s a lot like doing two Subtract operations and an Intersect all at once.
Using the Solid Tools
... is a straightforward undertaking. Just activate the tool you want to use, then start clicking on Solids in your model. For Union, Intersect and Split, it doesn’t matter what order you go in. For Subtract and Trim, click the cutting object first, then the Solid you want that object to cut. It helps to think to yourself, “Use this to cut that” as you’re clicking.
Check out this detailed video to learn more the Solid Tools and how they work:
More about Solids
The Solid Tools operate on a special class of entities called (you’ll never guess) Solids. Solids are nothing more than groups or components that:
are completely enclosed; you might say Solids are watertight, and
have no extra, loose edges or faces
Aside from letting you use the Solid Tools (which is pretty cool, we think) Solids are super-useful for another reason: SketchUp 8 (and SketchUp Pro 8) can calculate the volume of any Solid in your model. Just make a simple Solid and see for yourself. Here’s how:
Use the Rectangle Tool to draw a rectangle on the ground.
Push/Pull your rectangle into a box.
Select your new box (be sure to get all of it.)
Make a group by choosing Edit > Make Group from the menu bar. You’ve made a Solid!
Choose Window > Entity Info to open the Entity Info dialog box.
Select the group you made in Step 4. Its volume should appear near the bottom of the Entity Info dialog box.
The Wrap-Up
Both versions of SketchUp 8 (free and Pro) can make Solids and display their volumes in the Entity Info dialog box. If you want to include Volume as an attribute in a report you generate from your model, you’ll need SketchUp Pro 8. Similarly, you’ll need to have the Pro version of SketchUp 8 to use the brand new Solid Tools.
It's a small world, but I wouldn't want to paint it. – Steven Wright
If modeling the planet is like painting a house, Google provides a lot of different brushes. Internally, we have these big paint sprayers that we’re using in major cities to cover huge swaths of suburbia in a single stroke, but when it comes to the fine work, Google SketchUp and Google Building Maker are the hand brushes. They allow people all over the world to fill in the gaps, perfect signature buildings, and smooth over the mistakes left by the big rollers. With SketchUp 8, the geo-modeling brush set is better connected with Google’s massive geo-data paint bucket than ever before.
Jumpstart your model with Building Maker
SketchUp 8 can open Google Building Maker models downloaded from the 3D Warehouse, and every image used for texturing is automatically created as a Match Photo scene, saving you huge amounts of time gathering measurements and photographs of a building.
Open your Building Maker model and the new Outer Shell tool can merge its primitives into a single SketchUp mesh. From there, the revamped Scenes dialog box and Igloo Mode makes organizing and navigating between your scene tabs a snap. There are even new Style settings for the opacity of Match Photo overlays and backgrounds. A new Back Edges line style provides traditional hidden-line visualization of edges behind or inside your building, and the Push/Pull tool now has a preselect mode that allows you to move faces that you can’t see from a given scene.
Get highest quality, full-color terrain and imagery
The new Add Location feature allows you to import terrain directly into SketchUp without having to fire up Google Earth. Your imported terrain is higher resolution than it was in SketchUp 7, more accurate, and now in full color. Also, Photo Textures from Street View in Google Maps are now part of the revamped Google toolbar.
Model in context
If you’re designing a new building, you can use Building Maker right inside SketchUp 8 to create context models around your site. Simply Add Location to geo-locate your model, and then click the Add Building button. If your site lies in one of the (ever growing) list of Building Maker cities, you’ll be able to create the surrounding buildings in a fraction of the time it would take to model them from scratch. Also, you can find nearby buildings that others have modeled by selecting “Nearby Models” from the Navigation drop-down menu in the Components Browser.
Posted by Scott Lininger, SketchUp Software Developer
Google Sketchup Pro 8 (with LayOut 3) is now available for purchase or upgrade in English, French, Italian, German and Spanish. You can find out all about the great new features in this short video. It's really quite simple to upgrade from previous versions of SketchUp Pro to the latest one: If you have an active license for SketchUp Pro 7 (or 6, 5, 4, 3, 2, or 1) you can upgrade it to a SketchUp Pro 8 license through our online store. Once you've purchased your new, upgraded license, you'll receive an email with two important pieces of information:
1. A link to download Google SketchUp Pro 8 (if you haven't already) 2. License information you need to authorize your software
If you’d like to try it out before upgrading, please feel free to download an eight-hour trial from our website.
Here are some more things to keep in mind:
The cost to upgrade each license is US$95, EU€83 or UK£68.
Please have your current serial number, registered user and company name available when you visit the upgrade portion of our store.
If you do not have your current serial or authorization number, follow these instructions to locate and retrieve them.
If you have any trouble upgrading, please visit our Help Center for more detailed instructions.
If you purchased a SketchUp Pro 7 license on or after August 1, 2010, the upgrade fee is waived as long as you upgrade on or before November 1, 2010.
If you have an EDU license that is not yet expired, your SketchUp Pro 8 upgrade is free.
If you purchased a SketchUp Pro license through one of our authorized resellers, please contact that reseller directly for upgrade terms.
If you have a need to contact us through the Help Center in the near future, please keep in mind that while we do get a little bogged down at release time, we will do our best to get back to you as as quickly as possible.
Thanks for your continued business and happy sketching!
Today is an exciting day around the SketchUp World Headquarters out here in Boulder, Colorado. We’ve just kicked off our third bi-annual “3D Basecamp” to a crowd of SketchUp-savvy folks converging on The Dairy Center from all around the world. I’m looking forward to some great conversations about SketchUp and 3D modeling in general over the next few days. But that’s not our only news today...
We’ve also finished work on SketchUp 8, the next major release of our favorite 3D modeling tool. We’ve been heads down and working hard for most of the last year, and I’m happy to be able to share with you the fruits of our labor.
Google SketchUp 8 includes a batch of exciting new features. We’ve made it easier to build site context models for your projects using our ever-growing collection of geo-data. We’ve added a new collection of “Solid” tools for doing common additive/subtractive modeling operations and we’ve packed out LayOut with some new features that make it easier to document your models professionally.
Ordinarily, those of you who use SketchUp in a language other than English have to wait a few weeks for a version in your language. But not this time—today, SketchUp 8 is available for download in English, French, Spanish, Italian or German language versions. (We weren’t able to get all our translations done in time for release today, but keep an eye on this blog for news about SketchUp 8 in more languages soon)
As always, SketchUp Pro 8 is available for $495 from our web store. Upgrades from any previous version of SketchUp Pro can be had from for only $95. And, of course, we’ve still got a version of SketchUp available for free. Head on over to our main website for all the details.
You can be sure we’ll be talking about this release a lot over the next few days at 3D Basecamp, but I want to make sure that those of you who weren’t able to join us in Boulder have a chance to let us know what you think, too. I’ve posted a new Google SketchUp Questions and Ideas series. I’m listening, and I’ll respond to as many of the top posts there as I can.