
Ever wish that you could warp and bend stuff more easily in SketchUp? You can -- with the right plug-in. Ruby scripts for deforming your geometry abound; I wrote about FredoScale just recently. This time, I thought I'd mention Shape Bender by Chris Fullmer. You'll wonder how you got along without it.
What Shape Bender does is actually pretty straightforward: It takes any 3D object in your model and bends/stretches it along a pre-drawn path that you select. Simple, but unbelievably powerful. Take a look at the following examples.
 The straight, blue text is what I started with. The bent, yellow text is the result of my Shape Bender operation.
 The bending path (above left) is a 3D spiral.
 The possibilities are endless.
Shape Bender should be called Mind Bender. For a longtime SketchUpper like me, it's like my birthday and Christmas all rolled into one. But enough giddiness; here are the facts:
- Visit the Shape Bender thread at SketchUcation to learn about and download the script for free
- SB works on PCs and Macs, just like most SketchUp Ruby scripts
- SB is currently available with English and French UI (user interface)
- After you download the script, put both the Ruby file (it ends in “.rb”) and the folder in your SketchUp 7 Plugins folder
Here's my best attempt at a basic, getting-started set of Shape Bender instructions:
- Make sure the thing you want to bend is either a group or a component.
- Rotate it (if necessary) so it's lined up lengthwise along the red axis.
- Use the Line tool to draw a straight edge parallel to the length of the thing you want to bend. Make sure it's parallel to the red axis.
- Draw a curved edge that represents the bending path (that's my term, not Chris') for your forthcoming bent shape.
- Select the group or component to be bent.
- Choose Plugins > Chris Fullmer Tools > Shape Bender to activate the tool.
- Click once on the straight edge you drew in Step 3 (make sure it's highlighted before you click on it).
- Click once on the curve you created in Step 4.
- Wait for SketchUp to think. Depending on how zippy your computer is, maybe get some coffee.
- Take a look at the green preview to see what you're about to get. If it looks backwards, press the Up Arrow key on your keyboard to reverse the direction of the bending path. You can also press the Down Arrow key to reverse the direction of the straight edge you created in Step 3.
- When the preview looks the way you want it to, press Enter to finish the transformation.
Having spent some time with Shape Bender, here are some things I think it's helpful to know:
Location matters. Pay attention to the location of the straight, red axis-aligned edge you draw relative to the thing you're planning to bend. It basically acts as the "axis of bendation" (again, not Chris' term) for the operation. If you want your bent object's center line to follow the bending path precisely, draw the straight edge right through the center of the original object. Take a look at the following images to see what I'm talking about:
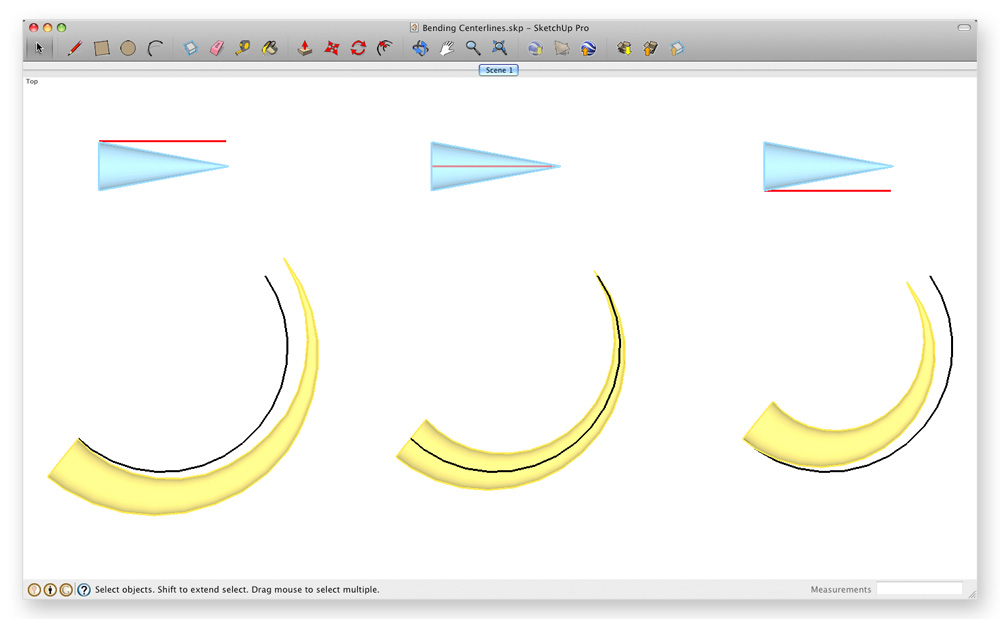 Note the different position of the red line relative to the original blue cone in each of the above three examples. Where you position the straight line has an effect on the result of your bending operation.
The length of your straight line matters. I’m referring to the one you drew in Step 3, above. Its length affects how the thing you’re trying to bend stretches (or squishes) when you bend it. If you want it to stretch, make your straight line shorter than your curved one. If you want it to squish, reverse that. To keep things from stretching or squishing, make both lines about the same length.
Beginnings and endings matter. Draw your curved bending path so its beginning and end points are at different places along the red axis. Otherwise, Shape Bender gets confused and freaks out.
Weld your bending path. The edge you designate as a bending path needs to be continuous; it can't be made up of more than one segment. To glue multiple segments together, use the Weld script. It's available for free at Smustard.com.
Congratulations on a great script, Chris. The SketchUp world owes you one.
Posted by Aidan Chopra, Product Evangelist

8 comments :
Excellent for creating components in a curve with slope.
Eloi
David Beckham, eat your heart out!
Great post Aidan, thanks for explaining it so well!
Nice intro to a very useful tool.
A couple of things that seems to trip people up with Shape Bender:
- Your Result will be made of segments, one for each segment of the Target Path. If you want a smoother looking Result, make a Target Path with more segments.
- Your source object essentially gets sliced up and the sections warped to put the slice faces on the Target Path. But the slice faces always stay vertical.
For most purposes, you'll want your Target Path to lie flat, like in the yellow "This is Amazing" above. If your path has vertical curves instead, it will still work, but your Result won't fan out and compress, it will slide up and down, like a deck of cards held vertically with some in the middle pushed up.
Notice in the spiral ramp how the ends stay vertical even though the Target Path is at an upward angle. If your "This Is Amazing" path had been rotated so it arched vertically, the letters at the ends would have been stretched vertically so much they might not be recognizable. With the path horizontal, they fan out like you expect.
I hope this helps,
August
when i click on http://forums.sketchucation.com/viewtopic.php?f=323&t=18210&sid=55f958893010c212f33b0c865aa05dd3
click on the download link there,It says access is only to authorised person, when i register , it still says so... my whole day was lost on trying to download this tool... please correct this post or delete it , so that other don't suffer !!:(
Hi Haribansa, I'm very sorry its not working. I know the link does still work, and the site is allowing new users for sure. I wonder if there is a confirmation email sent to your inbox that you need to respond to finalize your registration with the sjetchucation site? Or you can contact Gaieus there. This link: http://sketchucation.com/scf-contact-page2/ should take you to a form to fill out and contact Gaieus asking for help. Once fully registered, you will be able to download the file. Good luck! Post another comment here if you still need help, or post to the Shape Bender thread if you get the download to work. Thanks!
Hi Haribansa,
Please, use the Help form Chris suggested! The message will land at me and I can help you with any login issues over SketchUcation!
I tried your link: http://sketchucation.com/scf-contact-page2/ But it is broken. I have downloaded first the Progressbar.rb into the Plugins folder, then your Shape Bender program into the plugins folder as well. I got the shape bender icon on my toolbar. I built a cone and saved it as a component. When I select the component, I click on the Shape Bender button, but when I move my mouse pointer from the toolbar to the component, the blue lines around the component disappear, and the mouse icon now contains a line below the arrow. However, I can not effect anything on the screen.
Post a Comment