Over the years, we've gotten to know a lot about how our customers are using SketchUp Pro. What we've learned has helped us to educate professionals in other, related fields, and has done a lot to influence the development of our product. In short, we love to see what you do with the tools we make.
When it comes to LayOut -- SketchUp Pro's 2D companion app -- I think there's an opportunity for us to learn even more. Since LayOut 2 launched in late 2008, we've seen a huge increase in usage, but we don't have as many user stories as we'd like. We want to know more about how folks are using LayOut, and we want to see (and show off) more examples of the inspiring work that's being done.
If you're using LayOut, we'd love for you to take the time to tell us how: Please submit a case study (it doesn't need to be very long) by following the instructions at the bottom of our Case Studies web page. We'll do our best to feature your work on our blog, in the SketchUpdate newsletter, and on our website. Any architectural LayOut documents that we receive may also be showcased in our booth at the AIA National Conference this year -- fame and glory in Miami!
This is a great way to get your name out into the community; you'll also be helping us to understand more about the uses of LayOut in a variety of industries. To submit, just check out our Case Studies web page. When you're attaching files, it would be great to have your original LayOut file; it makes printing a whole lot easier (don't worry -- we won't share your original files with anyone).
One more thing: You can also find great examples of other people's submissions by filltering this blog for User Stories. Thanks, and we can’t wait to see what you’ve done.

Thursday, February 25, 2010
3D Buildings get smart
(Cross-posted from the Google Lat Long Blog)
The 3D buildings in Google Earth are a great way to understand an area visually, and they just got better at conveying information about the place itself. Currently, you can click on model that was created by 3D modelers using tools like Google SketchUp and Google Building Maker to open a balloon.
Today, we've added two new sections to those balloons: Photos of nearby places and Nearby places.

Not only can you learn more about the place from the balloon, but you can also dig deeper by following the links. Want to see more nearby photos and places? What to learn about the Ferry Building listed as a nearby place? Click the links in the balloon to explore further.
Next time you're exploring a city with 3D buildings, watch for the familiar glow as you hover over a building, and give it a click. You might learn something new about the place.
Wednesday, February 24, 2010
Case Study: Lowney Architecture
Often, while drinking morning coffee at my desk, I read the latest SketchUp-related stories and blog posts found by my favorite search engine and alert tool. One of these searches led me to the folks at Lowney Architecture. Their firm uses SketchUp for all types of projects -- big and small -- and they create SketchUp animations to better communicate their design ideas to clients and public agencies. Check out the case study they wrote below:
Animating the Discussion: An Oakland architecture firm uses Google SketchUp generated movies to improve design communication with commercial clients and general public.
Lowney Architecture, www.lowneyarch.com
If a picture is worth a thousand words, then how valuable is a movie? When it comes to communicating three dimensional ideas quickly, SketchUp models and animations speak volumes.
The reality of commercial architecture in today’s economic climate is one of increasingly condensed project schedules and budgets. Traditional visualization tools, such as physical models, simply take too long to produce in detail, analyze and alter. And sophisticated visualization programs like 3D Studio Max, while excellent for photo-realistic renderings and advanced animations, can be cost prohibitive, challenging to use, and incredibly difficult to master.
The Lowney crew uses SketchUp movies for projects of all types and scales, from restaurants to entire shopping centers; single family homes to mixed-use residential towers; site planning to urban planning. It is an exceptionally adaptable and scalable tool for communicating the firm’s designs to clients and public agencies.
Lowney uses Autodesk’s REVIT for technical drawings and design analysis, but BIM software is information-driven, and does not allow the free-flow process of idea generation, representation and manipulation that SketchUp’s intuitive interface enables.
The young firm’s body of work already includes a number of high profile commercial projects such as the award winning Whole Foods Market in Oakland. When Safeway Inc. engaged the firm’s design services to tackle some of their own more difficult urban redevelopment projects, using SketchUp movies to communicate design became a mainstay of Lowney’s design process.
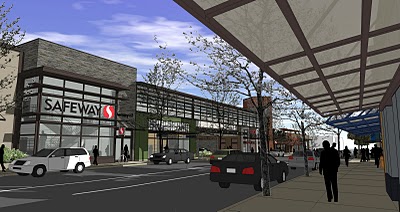
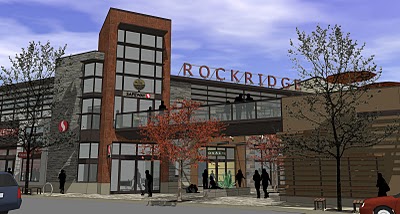
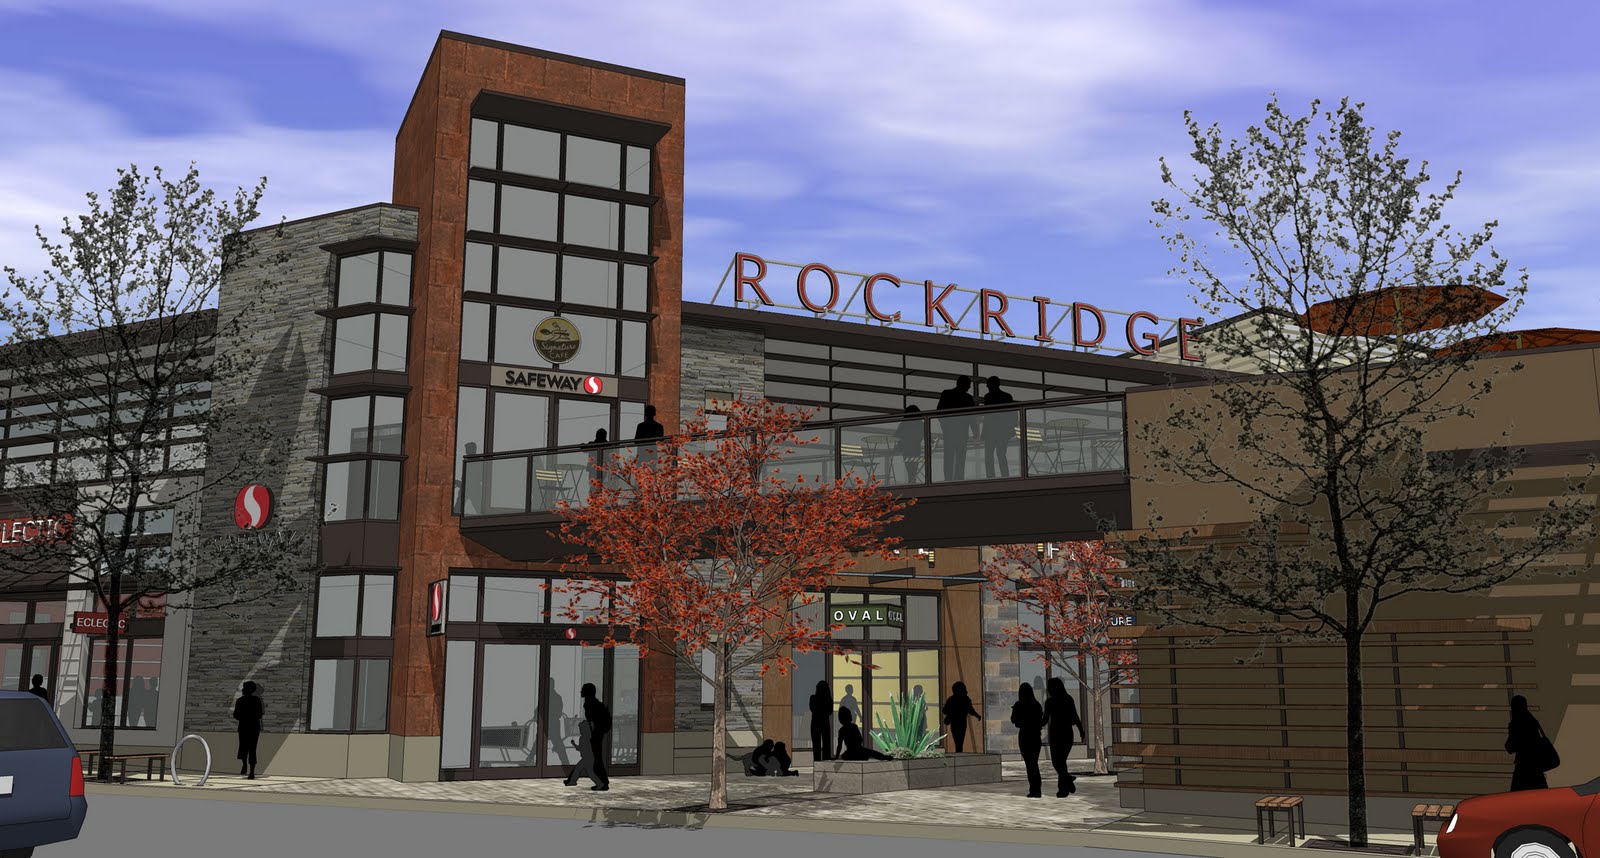
One of Safeway’s complex mixed-commercial projects is going through the planning approval process in Oakland. The site is a triangular block bordered by College and Claremont Avenues in Oakland’s Rockridge district. An existing 27,000 SF 1960’s era Safeway and a corner gas station will be replaced by a new 50,000 SF Safeway on the upper floor, with 12,000 SF of retail shops and covered parking at street level. The goals were to create a full service grocery store for the community, to minimize visible surface parking, and to further enliven the strong pedestrian retail experience along College Avenue.
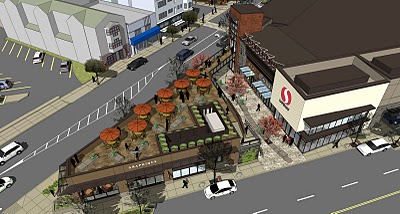 The proposed design and urban context were constructed in SketchUp and dozens of animated fly-around clips were rendered and edited together for presentation to the clients, community groups, and city officials. The movie was rendered in SketchUp and edited in Adobe Premier Elements in early 2009.
Watch additional movies and find project information on the firm’s website.
Animating the Discussion: An Oakland architecture firm uses Google SketchUp generated movies to improve design communication with commercial clients and general public.
Lowney Architecture, www.lowneyarch.com
If a picture is worth a thousand words, then how valuable is a movie? When it comes to communicating three dimensional ideas quickly, SketchUp models and animations speak volumes.
The reality of commercial architecture in today’s economic climate is one of increasingly condensed project schedules and budgets. Traditional visualization tools, such as physical models, simply take too long to produce in detail, analyze and alter. And sophisticated visualization programs like 3D Studio Max, while excellent for photo-realistic renderings and advanced animations, can be cost prohibitive, challenging to use, and incredibly difficult to master.
The Lowney crew uses SketchUp movies for projects of all types and scales, from restaurants to entire shopping centers; single family homes to mixed-use residential towers; site planning to urban planning. It is an exceptionally adaptable and scalable tool for communicating the firm’s designs to clients and public agencies.
Lowney uses Autodesk’s REVIT for technical drawings and design analysis, but BIM software is information-driven, and does not allow the free-flow process of idea generation, representation and manipulation that SketchUp’s intuitive interface enables.
The young firm’s body of work already includes a number of high profile commercial projects such as the award winning Whole Foods Market in Oakland. When Safeway Inc. engaged the firm’s design services to tackle some of their own more difficult urban redevelopment projects, using SketchUp movies to communicate design became a mainstay of Lowney’s design process.

One of Safeway’s complex mixed-commercial projects is going through the planning approval process in Oakland. The site is a triangular block bordered by College and Claremont Avenues in Oakland’s Rockridge district. An existing 27,000 SF 1960’s era Safeway and a corner gas station will be replaced by a new 50,000 SF Safeway on the upper floor, with 12,000 SF of retail shops and covered parking at street level. The goals were to create a full service grocery store for the community, to minimize visible surface parking, and to further enliven the strong pedestrian retail experience along College Avenue.
 The proposed design and urban context were constructed in SketchUp and dozens of animated fly-around clips were rendered and edited together for presentation to the clients, community groups, and city officials. The movie was rendered in SketchUp and edited in Adobe Premier Elements in early 2009.
 Watch additional movies and find project information on the firm’s website.
Text box shortcuts in LayOut
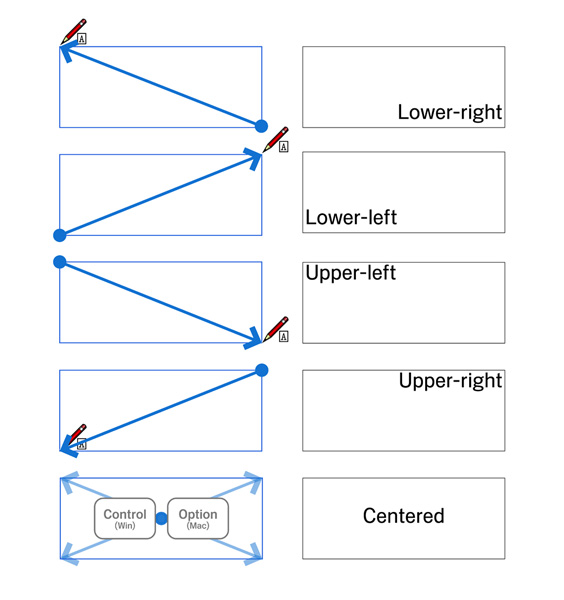
Our developers programmed a neat little time-saving trick into LayOut; it has to do with how you create text boxes with the Text tool. Basically, you can set a text box's justification (left, center, right) and alignment (top, middle, bottom) by deliberately drawing it in a specific way. Here's how it works: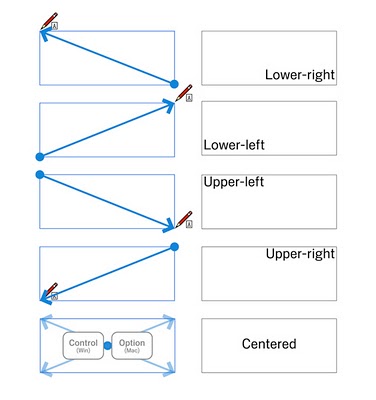
- Draw from upper-left to lower-right to create a Left-Top justified text box.
- Draw from lower-left to upper-right to create a Left-Bottom justified text box.
- Draw from upper-right to lower-left to create a Right-Top justified text box.
- Draw from lower-right to upper-left to create a Right-Bottom justified text box.
- Hold down Control (Command on a Mac) to create a Center-Middle justified text box.
Simple, but effective.
Posted by Aidan Chopra, SketchUp Evangelist
Tuesday, February 23, 2010
Building Maker in 8 more cities and 25 new languages
Today, we released two new international and six US cities for Google Building Maker. We now have high-resolution, multi-angle aerial imagery available for over 75 cities -- quickly modeling buildings for context or Google Earth just keeps getting easier.
 New cities (in blue): Seville, Spain; Berlin, Germany; Jacksonville, FL; St. Petersburg, FL; Clearwater, FL; Raleigh, NC; Memphis, TN; Houston, TX
There’s even more in store for our international users with this release! We’ve added support for more languages, so now your favorite online geo-modeling tool is available in a total of 39 languages.
New languages:
Bulgarian
Catalan
Chinese (Traditional)
Chinese (Simplified)
Croatian
English (United Kingdom)
Filipino
Greek
Hindi
Hungarian
Indonesian
Korean
Latvian
Lithuanian
Portuguese (Brazil)
Romanian
Russian
Serbian
Slovak
Slovenian
Spanish (Latin America)
Thai
Turkish
Ukrainian
Vietnamese
New cities (in blue): Seville, Spain; Berlin, Germany; Jacksonville, FL; St. Petersburg, FL; Clearwater, FL; Raleigh, NC; Memphis, TN; Houston, TXThere’s even more in store for our international users with this release! We’ve added support for more languages, so now your favorite online geo-modeling tool is available in a total of 39 languages.
New languages:
Bulgarian
Catalan
Chinese (Traditional)
Chinese (Simplified)
Croatian
English (United Kingdom)
Filipino
Greek
Hindi
Hungarian
Indonesian
Korean
Latvian
Lithuanian
Portuguese (Brazil)
Romanian
Russian
Serbian
Slovak
Slovenian
Spanish (Latin America)
Thai
Turkish
Ukrainian
Vietnamese
Layers vs. the Outliner
Lots of people ask me how I keep my SketchUp models organized; there seems to be plenty of confusion about when to use Layers and when to use the Outliner. Both devices let you control the visibility of different parts of your model, but each has its own strengths and weaknesses.


First things first: Make groups and components
I always use groups and components as my primary means of organization. This is critical regardless of whether I'm using Layers or the Outliner. How come?
Using Layers doesn't keep geometry isolated; edges and faces on one layer can (and will) interfere with edges and faces on another layer -- UNLESS those edges and faces are protected as part of a separate group or component. Making liberal use of groups and components is the surest way to avoid spending hours repairing your work.
The Outliner (Window > Outliner) is basically just a hierarchical list of the groups and components in your model. Only these two types of things show up; "loose" geometry (ungrouped edges and faces) doesn't. If you want to use the Outliner to control the visibility of different parts of your model, you need to make groups and components.
Why I use the Outliner most of the time
I like using the Outliner because it's a straightforward way of seeing all the bits and pieces of my models: If I've been careful to name everything as I go along (the only place in my life where I exhibit tidiness), the Outliner makes managing everything relatively easy. I can hide and show groups and components by right-clicking on their names, instead of having to dig through the geometry in my model with the Select tool.
I tend to use the Outliner much more than I use Layers because I find nested groups and components to be a very logical way to organize objects in 3D space. Any given entity can only exist inside one group or component at a time. This means that when I hide a group or component from the Outliner, I can be sure that everything inside it is hidden, too. If I unhide a group or component and something inside it still isn't visible, I know that all I have to do is turn on Hidden Geometry to find it.
With Layers, it's possible for a group or component to be on one layer and the entities it contains (edges, faces, groups, components, etc) to be on a completely separate layer. Turning on one layer is no guarantee that everything it contains will become visible. When this happens, turning on Hidden Geometry won't help -- stuff that's hidden on a layer which is turned off doesn't show up, even when Hidden Geometry is turned on.
Using Layers to control the visibility of individual entities in your model can be very, very tricky. Layers have, on occasion, made me want to throw my computer through a wall.
How I use Layers
Their sometimes frustrating nature notwithstanding, Layers are a pretty important part of the way I organize complex models in SketchUp. I can think of two major reasons why:
To improve system performance
I use Layers to control the visibility of large sets of similar objects -- furniture, plants, scale figures, cars -- that I want to be able to turn on and off all at once, regardless of which group or component they're a part of. Generally, this is so that I can control the way my model performs on my computer. Turning off "heavy" stuff like trees speeds things up.
Suppose I have a building with three floors (see below). Each floor has some furniture on it. I model each floor as a separate group so that I can show and hide it easily via the Outliner. Each group contains the furniture on that floor. The building envelope is a separate group.
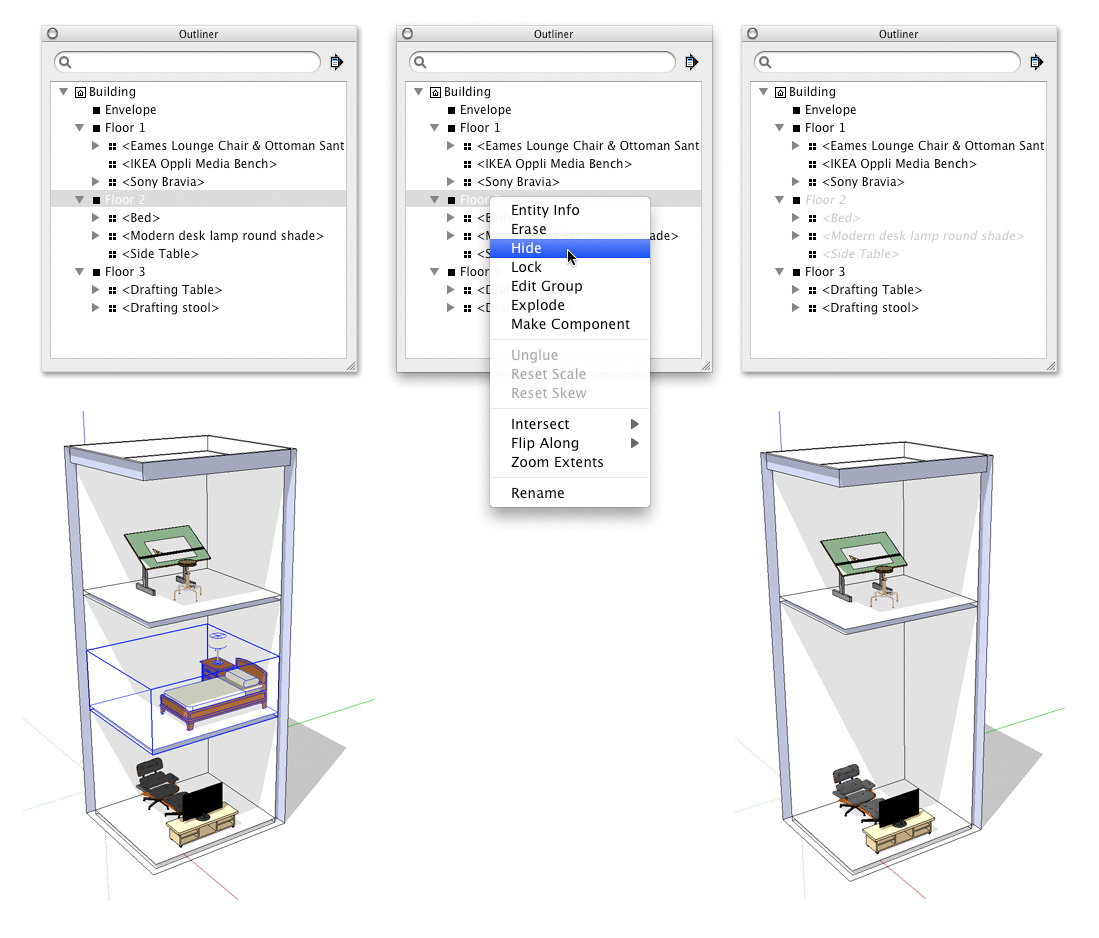
Use the Outliner to control the visibility of individual groups and components.
So that I can quickly turn on and off all of the furniture in the building (which will make the whole model easier to work with), I move each furniture component from Layer0 (the default) to a new layer called "Furniture".
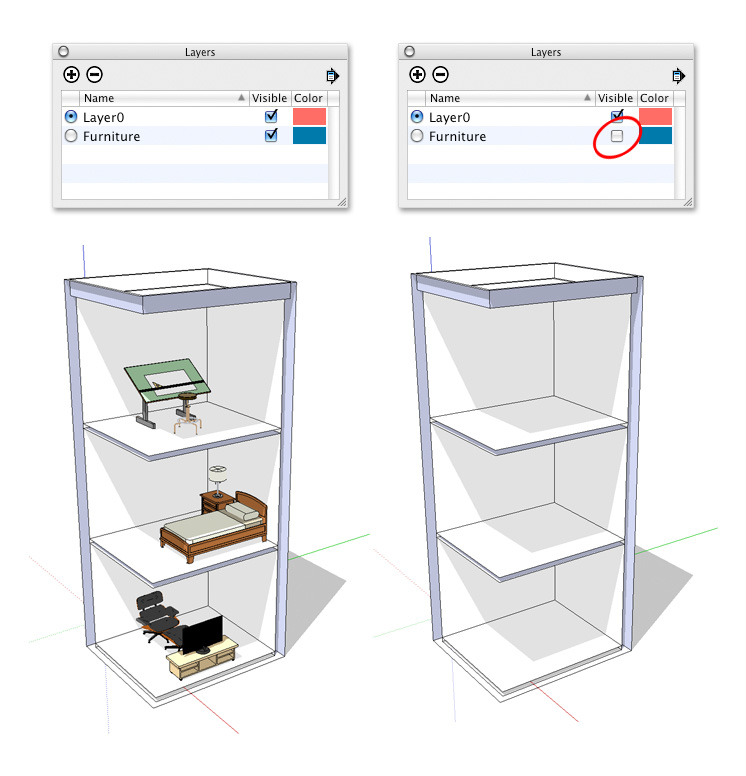
Use Layers to turn on and off sets of similar objects that "cut across" groups and components.
Now I can easily control the visibility of individual aspects of my building independently. Being able to turn on and off the furniture all at once makes it a lot easier to get things done.
To keep some things really separate
As I mentioned earlier, turning on Hidden Geometry only shows hidden geometry on layers which are visible. I take advantage of this fact to make sure that when I'm modeling and I need to turn on Hidden Geometry for some reason (like maybe to unsoften an edge), I don't end up getting confused by every hidden entity in my model. I use Layers to organize big, unwieldy chunks of geometry that I don't need to see all the time, but that I can't delete. Examples of these are contour lines, imported CAD drawings, previous design iterations, and large amounts of entourage (trees, furniture, etc). I keep these things on separate layers (as part of groups, of course) and I turn them on only when I need them.
Disclaimer
Plenty of modelers use Layers and almost never use the Outliner. Which system you choose is entirely up to you -- there's no right or wrong way to do things. As long as your big models aren't driving you crazy, you're doing fine.
Posted by Aidan Chopra, SketchUp Evangelist
Monday, February 22, 2010
Model Your Town: One week left to enter
Big, Flashing Reminder: There's one week left to get your entries in for the 2010 Google Model Your Town Competition. We've got some really beautiful towns so far, but it's likely that most folks are waiting until the very last minute to fill out the official entry form. The very last minute, in this case, is 11:59 PM PST on March 1, 2010.
Good luck!
Good luck!
Friday, February 12, 2010
Explore Vienna in 3D
We're pleased to announce the addition of Vienna, Austria to our collection of 3D cities in Google Earth.
Vienna is well known for its culture; its theater, music, opera and museums are all exceedingly popular destinations for locals and tourists alike. The next time I visit Austria, I'd love to catch a production of Faust at the Burgtheater. Vienna possesses some spectacular examples of Gothic architecture: the Rathaus (City Hall), the Votive Church, and St. Stephen's Cathedral. If your style runs more towards Art Nouveau, the Secession movement generated a number of notable destinations, such as the Karlsplatz Stadtbahn station.
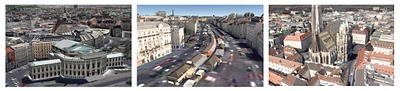 Happy (virtual) touring!
Geo-modelers: Join us in Zurich!
There's a growing community of people who have taken it upon themselves to model the whole world in 3D. Some are using Google SketchUp, some are using Google Building Maker, and some are using both together. There's a also a growing community of people who are using Google Map Maker to author and edit rich, 2D maps.
We decided to host a mini-conference that will bring 2D and 3D geo-content creators together for the first time: The 2010 Google Mapper/Modeler Summit is scheduled to take place on March 22 and 23 in Zurich, Switzerland. We're keeping the attendance small (fewer than a hundred people) to encourage conversations and dialog. In the same vein, the format for the event will be "unconference" -- specific session topics will be decided at the Summit, by the attendees themselves.
We have places left for geo-modelers: If you're an experienced geo-modeler who would like to attend, please fill out this form to request an invitation. Since spots are limited and there's no charge for participating, we ask that you provide the following two pieces of information on the form:
- Collection of models: A link to a 3D Warehouse collection that contains geo-models you've built and contributed
- Brief statement: A short paragraph (3 or 4 sentences) that outlines what you hope to gain by attending the conference. Please also mention any special knowledge or skills you might be able to contribute.
Experience the Winter Games in 3D!
The Google Boulder office is fanatical about 3D buildings in Google Earth, so you might imagine our delight when the folks over at EarthvisionZ dropped by the office to show us what they've been working on for the upcoming 2010 Winter Games.
EarthvisionZ is a geo-web development firm. Our first experience with their work was with EarthgamZ, where they developed a virtual experience for the 2008 Summer Olympics and Sports Illustrated's Top 100 Golf Courses in the U.S. EarthvisionZ is the next generation of that work and is well timed to take advantage of all the growing excitement about the games.
The first thing I did was fly to Colorado to see how many athletes we were sending to the Olympics from our sports-crazed state. Instead of getting a list of names on a page I was presented with a map of of custom placemarks depicting the name of each athlete and their sport. If you click on an athlete's name, it shows athlete stats, news, medal wins, social links, and a brief bio.
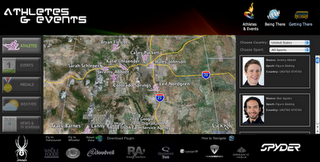
EarthvisionZ makes good use of the 3D models that we developed for the Winter Games. Clicking on any of the building placemarks produces an event and TV schedule so you know when your favorite athlete or sport is scheduled.
If you happen to be lucky enough to be attending the games, the "Getting There" link is pretty handy as it provides a visual mapping of your travel options, link to tickets, and border wait times. Once there, the "Being There" tab will help you navigate the city and find what your looking for quickly and easily with reviews and live tweets on the ground.
Wednesday, February 10, 2010
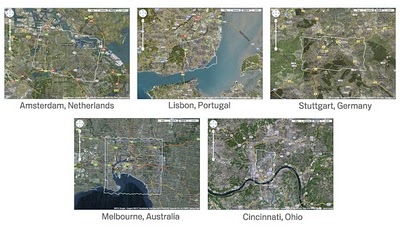
Building Maker in the land down under
We're excited to announce the appearance of a fourth continent in Google Building Maker: Australia. This doesn't mean you have to eat Vegemite, know what a boomerang is or sing a Men at Work song to get started -- just visit Building Maker and select the city where you wish to start modeling.
In addition to Melbourne, Australia, we've also added four others:
The addition of these five locations brings the total number of Building Maker cities to 71.
In addition to Melbourne, Australia, we've also added four others:
- Amsterdam, The Netherlands
- Stuttgart, Germany
- Lisbon, Portugal
- Cincinnati, USA
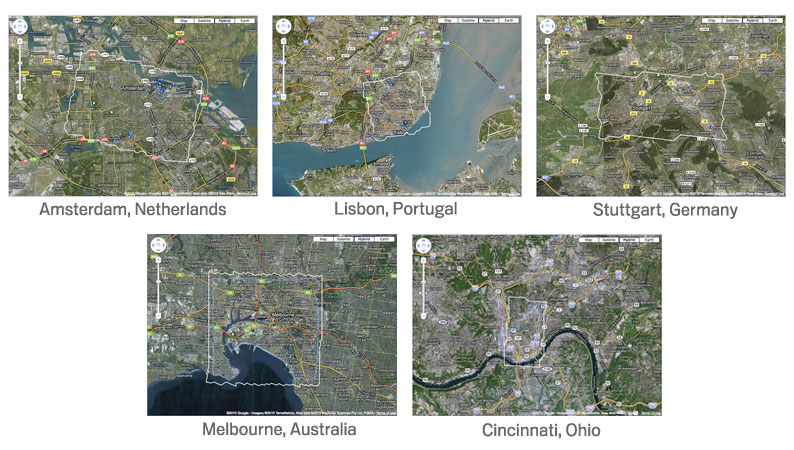
The addition of these five locations brings the total number of Building Maker cities to 71.
Thursday, February 4, 2010
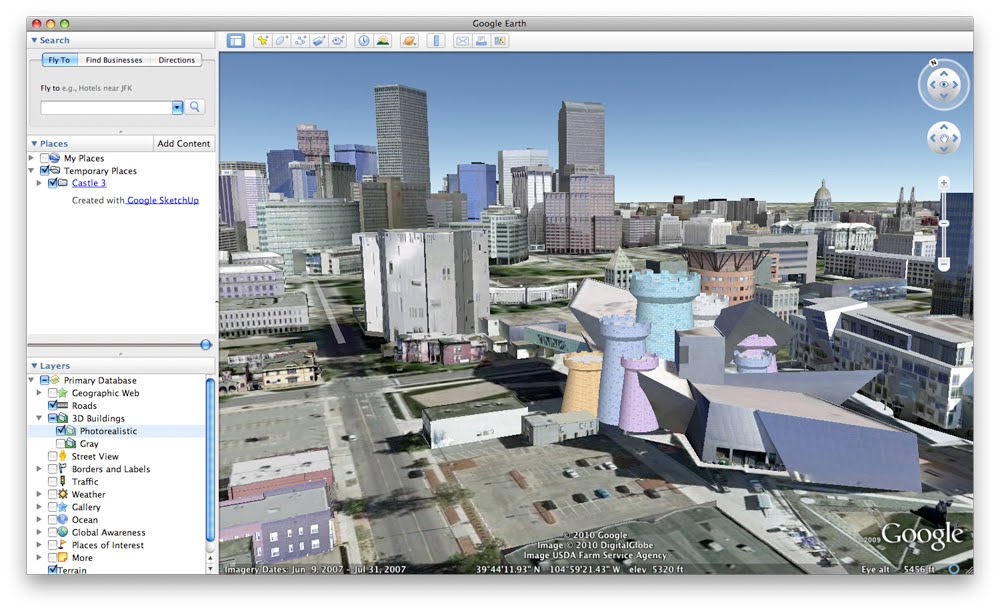
Hiding individual 3D buildings in Google Earth
As tips & tricks go, this is a pretty darn simple one: You can individually hide the buildings on the default 3D Buildings layer in Google Earth. This is helpful when a model you're trying to show conflicts with a building that already exists. When you're in Google Earth , just right-click any 3D building you see and choose Hide building. Buildings you hide stay hidden until you restart Google Earth.
 This castle is site-specific.
 Uh oh. The existing museum is visible, too.
 My castle, in context, sans museum.
Here's an example:
I'm designing an awesome castle for the site of Daniel Libeskind's Denver Art Museum. See below to experience the majesty of my creative genius.
 This castle is site-specific.
I turn on the 3D Buildings layer in Google Earth to show the rest of the city. After all -- my intervention is highly contextual. When I do, Libeskind's museum shows up, too. Sure enough, it conflicts with my SketchUp model.
 Uh oh. The existing museum is visible, too.
I right-click on the museum and choose Hide building.
 My castle, in context, sans museum.
Delicious.
Posted by Aidan Chopra, SketchUp Evangelist