Sketchup Blog - News and Notes from the Sketchup folks

Personal Fabrication with SketchUp: A Primer

With all the hullabaloo about Personal Fabrication lately, scads of committed SketchUp modelers are getting very excited about turning their digital models into honest-to-goodness, physical things. The idea is thrilling, but the process of actually going “from idea to object” can be intimidating. The PF train is just leaving the station, but with a little bit of help, anyone who knows their way around SketchUp can climb aboard. I promise.

Getting Started

The first thing to realize is that there are basically two types of personal fabrication (at least when it comes to SketchUp.) The technologies are completely different and each is appropriate for specific kinds of objects. Which one you choose depends entirely on what you’re trying to make.

2D CNC Fabrication

2D CNC Fabrication is all about cutting parts out of flat sheets of material. These flat pieces are then manually assembled into a 3D object by means of slots, fasteners or glue. The challenge lies in designing the “kit of parts” such that everything fits together. You’re actually making two models: one to design the final assembly (Image 1) and one that lays out all the pieces for cutting (Image 2).
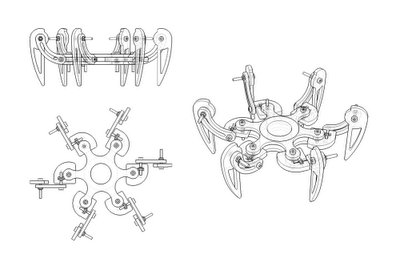
Image 1: Build the first model to design the final assembly of parts and pieces. This is John Bacus’ design for the SKPRbot that we’re giving away at Maker Faire this weekend.
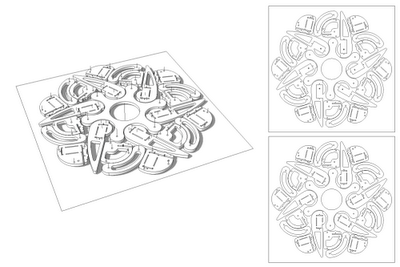
Image 2: Your second model lays out the pieces on a flat cut sheet. Since cost is directly related to the amount of material you use, you’ll save money by designing efficiently. The cut sheets on the right are just Top views of the model on the left (with Perspective turned off.)
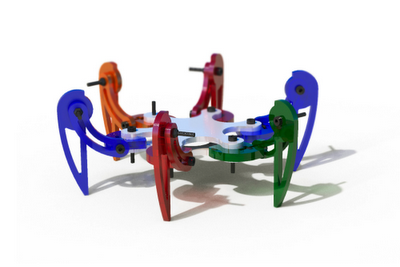
Image 3: A rendering of a completed SKPRbot. This one’s been cut out of several different-colored sheets of translucent acrylic.

The cost of CNC-made stuff is generally a function of two things: material type and material quantity. Because of this, it behooves you to design your “cut sheets” as efficiently as possible. Squeeze parts together to save money. The materials available to you are many; wood, metal, cardboard and plastic are all options.

One more thing about CNC: There are lots of ways to cut things out. Some machines use lasers, some use water and some use metal bits like the ones you find on a router. Knowing which cutting technology you’ll be using is important because lasers, water and metal bits have different kerfs, or cutting widths (Image 4, below). Obviously, that’s something to keep in mind as you’re designing your cut sheets.
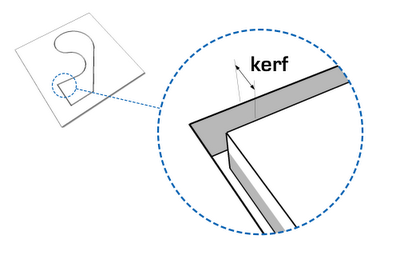
Image 4: Kerf is the width of the cut left by whatever tool is doing the cutting. Lasers have negligible kerfs; CNC routers have more significant ones.

If you’re planning to buy your own CNC hardware, I’d recommend having a look at ShopBot. Their machines are of the “metal router bits” variety; their focus is predominantly on woodworking.

If, on the other hand, you’d prefer to work with a service provider who can cut out your project and ship you the parts, you’d do well to peruse Ponoko’s website. It’s well-designed, beginner-friendly and affordable. To send a 2D cut sheet file to Ponoko, you’ll need to export an EPS file using Google SketchUp Pro. Beyond that, their 2D Design Tips page is super-helpful.

Additive Manufacturing

Additive manufacturing (or 3D printing, as less fancy people call it) involves squirting material onto a platform. Starting at the bottom and working up, layers are “printed” on top of each other until a 3D object is formed. Different 3D printing machines use plastic, resin, powder (which is hardened into a solid) and even metal. Printed objects can be monochrome or multi-colored.
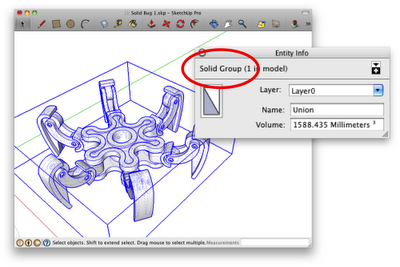
Image 5: No matter how you’re 3D printing, the first step is to make a “solid” model. Skip down a few paragraphs to learn more about what this means.
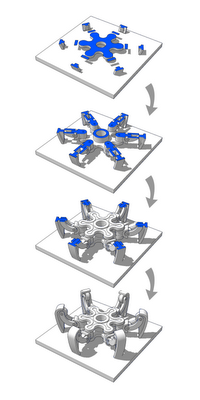
Image 6: 3D printers build up layers of material in order to create 3D objects. Temporarily floating elements sometimes need sprues or other forms of support, but these aren’t show in the pictures above.
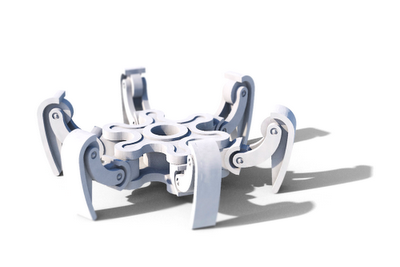
Image 7: A rendering of a solid-printed SKPRbot. This one is monochromatic because it’s made from a single material, but 3D prints can also be multicolored if you use the right machine.

In general, the cost of additive manufacturing is based on the physical size of the thing you’re trying to print. Most machines top out at objects that are about the size of a lampshade. Choosing fancy materials (like stainless steel) can be pricey, but palm-sized objects printed in resin or plastic are surprisingly economical.

Some machines can even produce interconnected, moving parts by printing a second type of material where voids occur. After the whole thing is made, the second material (it’s often wax) is melted away, leaving just the main components. This is a great way to prototype close-fitting connections like ball-and-socket joints and threaded parts.

The biggest gotcha when it comes to modeling 3D printables with SketchUp has to do with solidity. Every printed object is made out of solid material, whereas every SketchUp model is completely hollow. What’s a devoted SketchUpper to do?

The answer is to create a model which can be considered solid. A solid model (as far as SketchUp’s concerned) is completely enclosed; if you filled it with water and shook it, none would leak out. Happily, one of the features we added to SketchUp 8 is a solidity-checker. The Entity Info dialog box tells you if a group or component is solid. (See Image 5, above.) You can read more about this (and about the Solid Tools in SketchUp Pro 8) in this post from last year.

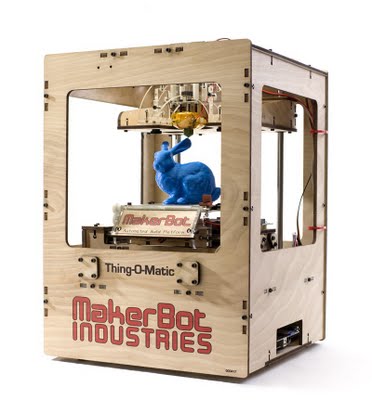
Buying your own professional-quality 3D printer will set you back about as much as buying a nice car. If that’s a problem for you (it is for me) there are hobbyist machines that you can buy and assemble yourself. They’re all offshoots of the RepRap project, but the best-known and most commercial units are sold by MakerBot Industries. For less than $1500, you can have a personal fabrication facility in your dining room. A huge community of enthusiasts are exploring SketchUp (and other software) workflows online. These are exciting times, to be sure.

Image 8: The Thing-O-Matic from MakerBot industries costs all of $1299. Blue bunny not included.

For the less DIY-inclined among us, there are plenty of great 3D printing service providers who can handle the messy business of actual output. All you do is upload a 3D model and wait for your object to arrive in the mail. Ponoko (mentioned above in the CNC category) is an option; their SketchUp workflow is simple and straightforward.

Another great service provider is i.materialise. With equipment capable of 3D printing human-sized objects and years of experience rapid prototyping things like artificial heart valves, this company is very, very capable. Even better, their SketchUp plugin makes 3D printing as painless as possible.

Update: Also check out www.shapeways.com if you're looking for a 3D printing service provider. Shapeways likes SketchUp, too : )

In the next few weeks, we’ll follow up on this post with specific examples and step-by-step workflows for various personal fabrication methods. Stay tuned!

Permalink | Links to this post | 14 comments

Join us at Maker Faire

[Cross-posted from the Official Google Blog]

Creativity at Google isn’t just limited to the time we spend in front of our keyboards—many of us are also enthusiastic about making things with our hands. At our Google Workshops, for example, employees have the chance to use sophisticated tools and machines to physically prototype their ideas. The Street View trike and several components of our self-driving cars were built in these workshops. It’s also not unheard of for Googlers to build their own zip-lines, perform crazy experiments with giant lenses and just get plain silly.

This weekend, we hope to bring this spirit of creativity and experimentation to attendees of Maker Faire Bay Area, whose mission is to "celebrate arts, crafts, engineering, science projects and the Do-It-Yourself (DIY) mindset.”

Our own Maker Faire theme is simple: “Dream, design, build. Repeat.” At the event, we’ll demonstrate how Google technologies, like SketchUp and the Android Accessory Development Kit (ADK), can help you take your project from idea to object.

Design of our booth made in SketchUp

In keeping with the DIY vibe, our booth was constructed three full-size recycled shipping containers and outfitted with big screen TVs, 3D printers, CNC cutters and, most importantly—robots! Folks from the Google SketchUp team and the newly-formed Cloud Robotics team will be on hand to walk you through the steps of of designing, fabricating, building and programming your own robot.

SKPR Bot

Our booth will also have demos, games, giveaways, hands-on activities for both kids and adults and talks from folks like MAKE Editor-in-Chief Mark Frauenfelder. And to top it off, we'll open Maker Faire each morning with an Android-powered weather balloon launch at 10:00 am PDT (weather permitting).


See our Google at Maker Faire site for a full schedule of Google events, and make sure to follow @sketchup on Twitter for updates throughout the weekend.

Fellow Makers—we hope to see you there!

Permalink | Links to this post | 5 comments

Banff puts itself on the 3D map

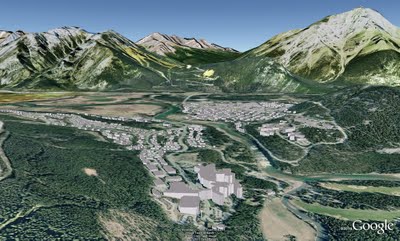
For a while now, the SketchUp sales team has been working on an important side project: We’re on a mission to collect cities’ 3D model data sets to add to Google Earth and Maps. Adding photo-textured or even gray building data can improve the way cities are visualized. Last year we worked with the Town of Banff (in Alberta, Canada) to get a 3D model of their municipality into Google Earth and Maps. Steve Nelson, Banff’s GIS Coordinator, writes:

The Town of Banff realizes the power of location and how it can benefit our residents and visitors alike. By contributing our town-wide 3D building outlines to Google’s Cities in 3D program, we’re able to visualize the town in a way that just can't be conveyed using traditional media.

Banff, Alberta in Google Earth, visualized with contributed gray building data

Visitors can fly right down to street level; turning buildings on and off gives them the ability to choose lodgings that offer amazing views of Banff National Park and the majestic Rocky Mountains. It also allows people who aren't familiar with the layout of the town to get a feel for the streets and services before they arrive. We have Banff's Roam transit system tied into Google Earth so visitors can see what's located around each stop -- and even when the next bus is scheduled to arrive!

Starting with gray extrusions often motivates geo-modelers to replace prominent buildings with full-fledged 3D models made in SketchUp.

3D building modelling also allows town planners and decision makers the ability to do some basic streetscape analysis and use the 3D capabilities in important project presentations such as the Town of Banff Signage and Wayfinding project. We are slowly applying facades to building shapes. Examples include the Town Hall and the Canada Post office. The feedback we've received from the few buildings we've completed have been very positive!

You can submit your town or city’s models for inclusion in Google Earth. Read about the Cities in 3D program to learn all about it.

Permalink | Links to this post | 6 comments

Sign Up for the Geo Teachers Institute

[Cross-posted from the Google Lat Long Blog]

For years, Google's geo products have been identified as a powerful learning toolkit that can help students conceptualize, visualize, share, and communicate information about the world around them.


This fall, we will host two Google Geo Teachers Institutes: September 23 and 24, 2011 in Washington DC at National Geographic Headquarters and September 26 and 27, 2011 at the University of Southern Maine Lewiston-Auburn College in Lewiston, Maine.

This event is a free professional development experience designed to help educators get the most from Google's geo products and technologies. The Geo Teachers Institute is an intensive, two-day event where participants get hands-on experience using Google Earth, Google Maps, and Google SketchUp, including a focus on features like Ocean, Mars, Moon and Sky in Google Earth.

Attendees will learn about innovative instructional strategies and receive resources to share with colleagues. The Google Geo Education team hopes this event will empower educators to bring the world's geographic information to students in a compelling, fresh, and fun way.

If you are interested, please complete this application. You will be notified if you are selected by August 15, 2011. Even if you can’t make it to this event, we have many online resources available for Google Earth and SketchUp and encourage you to check them out.

Posted by Tina Ornduff, Geo Education Program Manager

Permalink | Links to this post | 4 comments

Introducing the Product Connect plugin for Google SketchUp

Recently, our friends (and official Partners) at Igloo Studios released their Product Connect plugin for SketchUp. The plugin is designed to help you get more out of product models stored in the 3D Warehouse.

3D models which are “Product Connect-enabled” are rich with information; they can include SKUs, website links, dimensions and in some cases, pricing information and environmental statistics. After adding these PC-enabled models to your SketchUp project, you can use the Product Connect plugin to export the metadata as an organized product schedule in the form of a spreadsheet. Igloo’s new offering makes going from conception to production a heck of a lot simpler.

Here's how it works:

  1. Download the Product Connect plugin from Igloo Studios website and install it on your machine.
  2. Find a Product Connect-compatible model in the 3D Warehouse and download it into your SketchUp model.
  3. SketchUp model with Product Connect-compatible models
  4. Open the Product Connect tool set and click Report Maker.
  5. Report Maker window
  6. Select a product schedule type (such as Cabinet or Appliance), then click the Create Reports button. The plugin generates a spreadsheet containing all of the product models as well as their relevant metadata.
  7. Product Schedule report

Today, there are hundreds of Product Connect-enabled models freely available in the 3D Warehouse. These include:

Are you a product manufacturer who’d like to offer PC-enabled models on the 3D Warehouse? Any product manufacturer can participate by creating new Product Connect-enabled models or by upgrading existing SketchUp models to be compatible with this system.

Congrats to the team at Igloo for helping to solve a long-standing problem. This tool connects product manufacturers with millions of SketchUp modelers who want to make use of those products in their designs. Posted by Gopal Shah, SketchUp Marketing

Permalink | Links to this post | 5 comments

The $300 House Challenge

Recently, the gang at SketchUp received a very interesting phone call from a gentleman named Christian Sarkar. He had initiated a challenge to see if someone could design a radically affordable $300 house for the poorest of the poor. At first, we were skeptical, but Christian’s passion, thoughtfulness and vision won us over and we thought SketchUppers were just the group up to this task. So here goes: The challenge: Design a simple dwelling that can be constructed for under $300 which keeps a family safe, allows them to sleep at night, gives them both protection from the elements and a sense of dignity.

The project is asking anyone – from designers and architects, students and professionals, to submit their designs in an effort to find affordable housing solutions for the poorest of the poor.

The $300 House project began as a challenge to businesses in a Harvard Business Review blog post by Dartmouth professor Vijay (V.G.) Govindarajan and co-author Christian Sarkar, an independent marketing expert.

Designers are encouraged to submit their entries for review and discussion. “We want designers and architects to see this as a business opportunity, not as a charity case study,” says Govindarajan. “This design challenge can help us get innovative people to focus on a vast un-served market waiting to be created across the world.”

Winners will be selected by the online community and an expert panel of judges – which includes Yves Behar, Rahul Mehrotra, Bob Freling, Stuart Hart, and others – along with celebrity judge David Hinds of reggae supergroup Steel Pulse.

In addition to a cash award, winners also receive a scholarship to a two-week workshop to both build actual prototypes of the $300 house, as well as operationalize a social venture to manufacture and distribute the homes.

The Economist recently featured the $300 House; here’s what they had to say:

Some emerging-world governments are beginning to realise that providing security of tenure is the only way to deal with the problem of ever-proliferating slums. And big companies that face stagnant markets in the West are increasingly fascinated by the “fortune at the bottom of the pyramid”. Bill Gross of Idealab reckons the market for cheap houses could be worth at least $424 billion. But in reality it is worth far more than that: preventing the Earth from becoming what Mike Davis, a particularly gloomy follower of Marx and Engels, has termed a “planet of slums”.

There are a little over 2 weeks left in the contest and you can take a look at some of the submissions here.

Now, what are you waiting for? Go, go, go! Posted by Gopal Shah, SketchUp Marketing

Permalink | Links to this post | 4 comments

New cities and better coverage in Building Maker

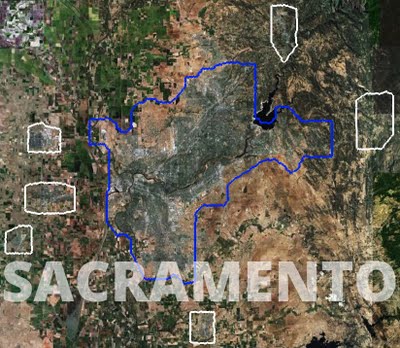
If you climb up on the roof of your house and cup your hands to your ears, I’ll bet you’ll hear cheering. That’s the sound of everyone in Fresno, Lake Tahoe, Austin, Phoenix, Sacramento, San Diego and St. Louis celebrating the arrival of better Building Maker coverage in their cities. Touching, no?

White outline shows current coverage area; blue indicates previous boundary.

Learn all about Google Building Maker (the coolest dedicated geo-modeling tool around) and give it a whirl when you’re ready. 116 cities so far!

Permalink | Links to this post | 3 comments

Mapping the BolderBOULDER in 3D

[Cross-posted from the Google Lat Long Blog]

The BolderBOULDER is one of the United States’ biggest 10K road races. Last year, more than 54,000 people participated, including several members of the SketchUp team and plenty of other Googlers from the Boulder office—after all, it’s right in our backyard.

Back in January, a group of us met with the race’s organizers to figure out ways that our geo-technology might play a role in this great local tradition. Our team ended up putting together a couple of nifty 3D maps that should help everyone (runners and spectators) get their bearings ahead of race day on May 30th:

The 3D Course Map lets you preview the race route in Google Earth.

We used the Google Earth API to embed an interactive course map on BolderBOULDER’s website. With the Google Earth plugin installed, you will be able to see hundreds of 3D models of the buildings along the course, as well as special race day structures we modeled just for the event. Be sure to click “Run the Race” (in the upper-left corner of the screen) to take a guided tour of the course.

The Transportation Map provides information about getting to the race.

To help folks get to and from the race, we used the Google Maps API to embed a map with information about public transportation options, road closures and parking.

Whether you’re planning to join us in Boulder or just perusing the course from afar, feel free to explore the maps we built. No running shoes required, and no one’s keeping time.

Posted by Kay Chen, Geo Program Manager

Permalink | Links to this post | 3 comments