
The most sure-fire way to mitigate your model’s geometric complexity (its count of faces and edges) is to pay attention to extruded circles and arcs. Experienced modelers know that curves in SketchUp are actually constructed out of multiple, straight edges. By default, circles have 24 sides and arcs have 12 sides. Zoom in and you’ll see what I mean:
 By default, circles you draw in SketchUp have 24 sides.
 Arcs you draw in SketchUp are 12-sided by default.
When you extrude a default, 24-sided circle with the Push/Pull tool, you create a cylinder with 26 faces. Choosing View > Hidden Geometry shows the smoothed edges between the faces:
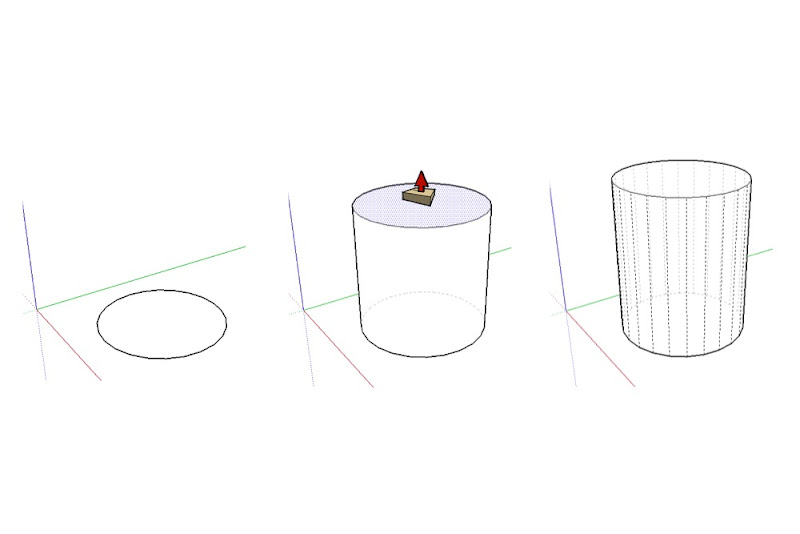 Turning on Hidden Geometry shows a default cylinder for what it really is: a 24-sided extruded polygon.
Using two default arcs and the Follow Me tool to create an fancy bullnose along the perimeter of a rectangular countertop yields no fewer than 90 new faces:
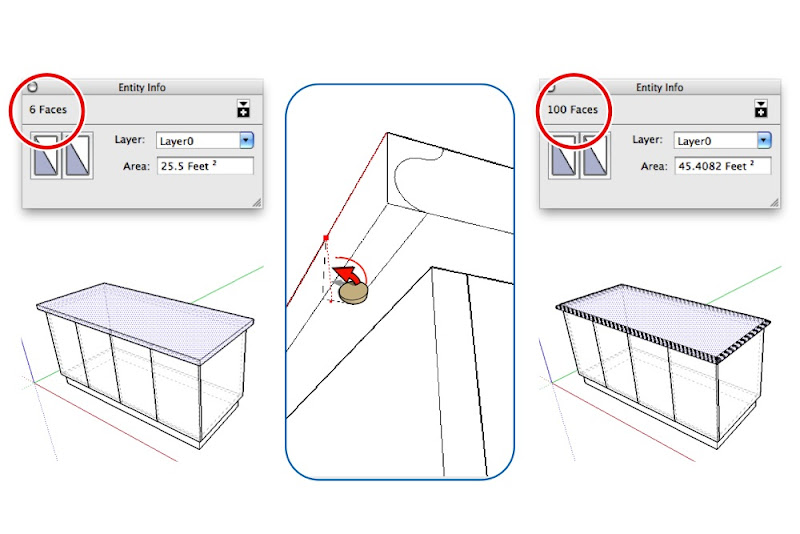 Using the Follow Me tool to extrude compound curves made out of default, 12-sided arcs results in seriously high polygon (face) counts. Thumbs-down -- this is bad SketchUp practice.
Modeling a simple bike rack using a combination of 24-sided circles, 12-sided arcs and Follow Me, then placing ten of those bike racks in your design, adds more than 86,000 entities (faces and edges) to your model. Oof.
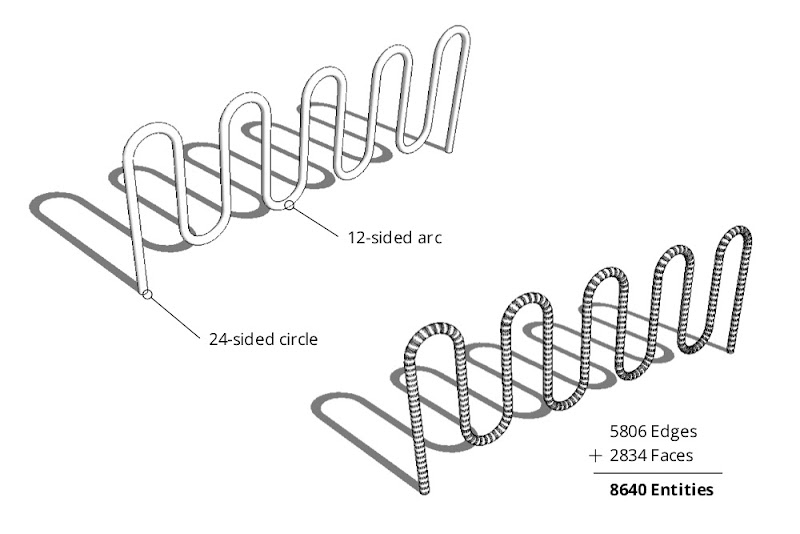 A single bike rack made by extruding a 24-sided circle along a path made from 12-sided arcs. Unless you're designing the bike rack itself, there's no call for adding this much geometry to your model.
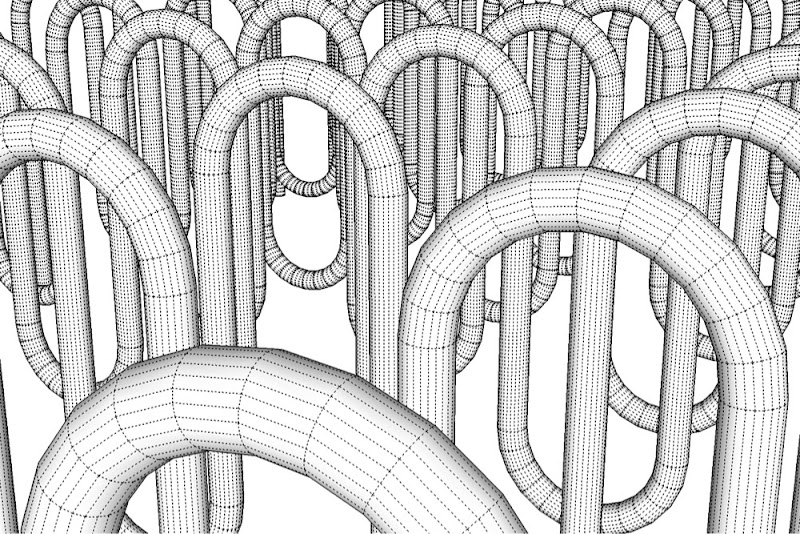 A close-up of the high-polygon bike rack. Individual faces and edges are made visible by turning on Hidden Geometry. Images like this one cause expert SketchUp modelers to have nightmares.
The Solution
To dramatically reduce the amount of geometry in your models, change the number of sides in your circles and arcs before you extrude them into 3D shapes. It’s easy:
1) Create a circle or an arc using the appropriate tool.
2) Before doing anything else, type “6s” and hit Enter.
This tells SketchUp to draw the curve you just created using six sides. The “s” tells it that you’re changing the side-count and not the radius. Of course, you don’t have to choose six sides — you can type in any number you like.
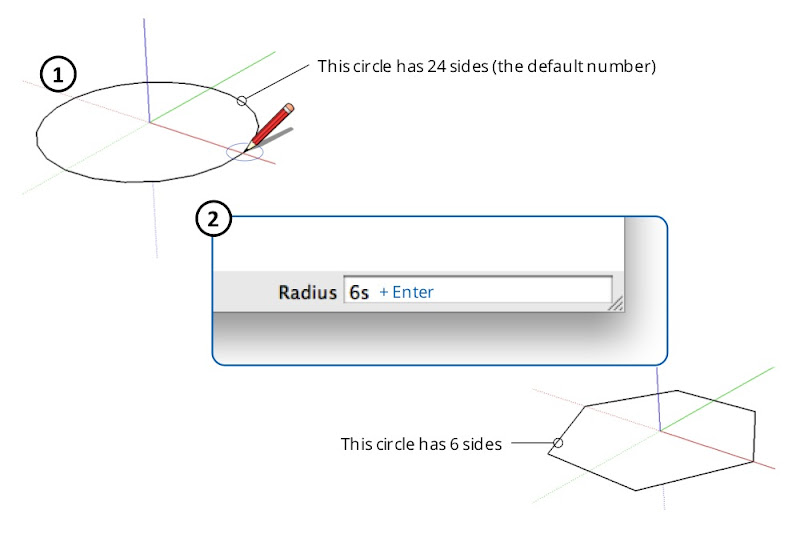 Change the number of sides in the circles and arcs you draw. I know, I know -- a hexagon isn't a circle. Suspend your disbelief in order to have usable models.
Note: Once you’ve manually changed the number of sides in a circle or an arc, every subsequent circle or arc you draw will have that same number of sides.
I modeled the bike rack below using 5-sided circles and 6-sided arcs. It only has 322 faces -- an 89% reduction over the bike rack I modeled using curves with the default number of sides.
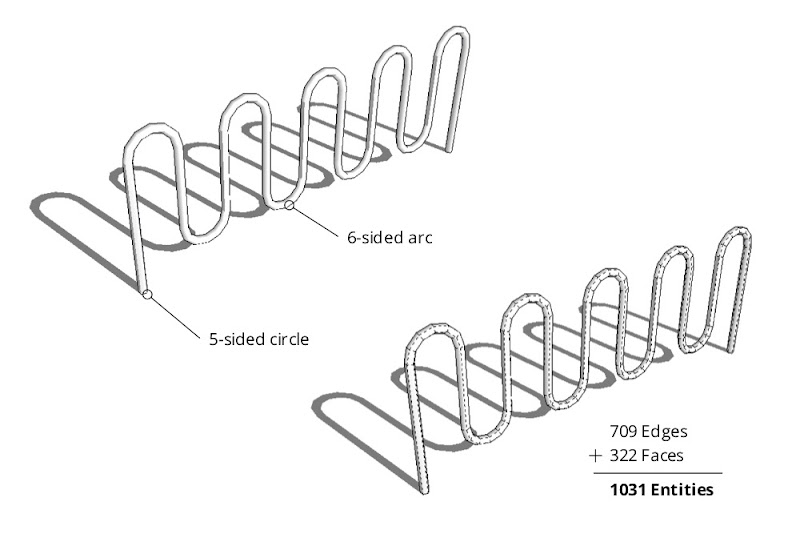 Crafting a bike rack by extruding a 5-sided circle along a path with 6-sided arcs yields a perfectly usable model with substantially fewer faces and edges.
When it’s used as context in my model, can you tell the difference between the “high-poly” (geometrically heavy) and low-poly versions? I thought not.
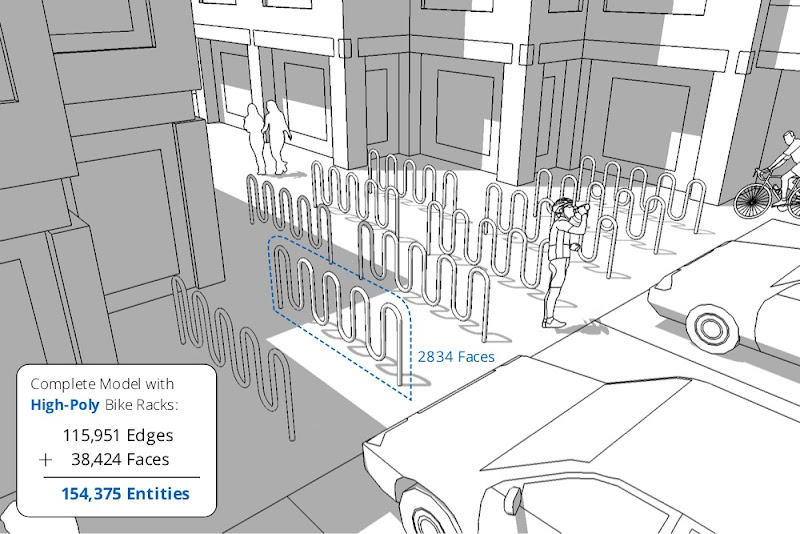
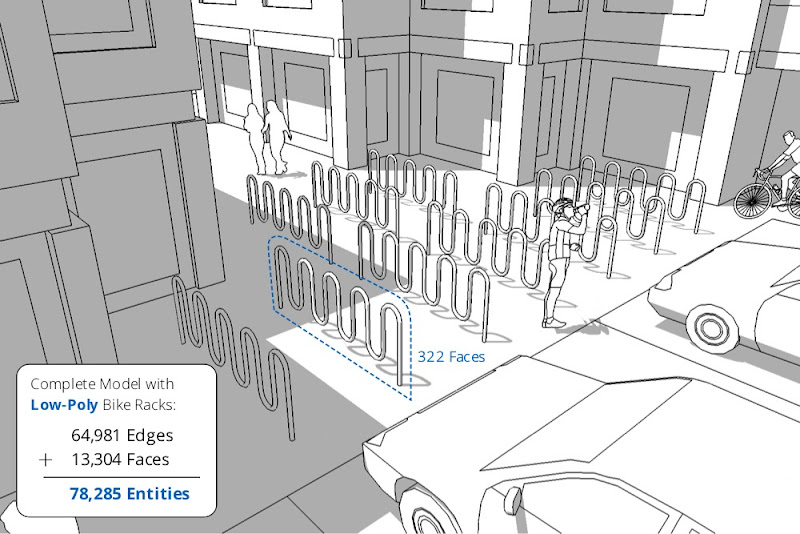 Is the quality difference between the high-polygon (top) and low-polygon versions of the bike rack worth making your model twice as heavy? Nope.
Permalink | Links to this post |

19 comments :
Very useful - thank you very much. I modelled a candelabra a couple of days ago that ended up a massive file. Now I know why.
I think this is very good for models with few details... However, while modelling mechanical components with Sketchup, sometimes I have to use 48s and 96s to obtain good smooth surfaces. The file size increases a lot but final results are good enough to print close views of components with great detail
Good post, Aidan. I frequently find that for small radius curves such as round overs or other profiles on table top edges, as few as 3 or 4 sides on the arc is plenty. When I also need to show close up details such as a molding profile, I'll create a separate profile with a higher entity count but I won't extrude it. For my use making highly detailed furniture models I find this substitution technique works quite well.
I teach Sketchup and the first thing I tell to my students is "Think in Low poly" unless what you are modelling needs to be very detailed, this is a very important topic since not everydoby have a workstation and the model process can be slowed down a lot while populating the model with components. Good post Aidan
Nice, Would be great if we could have an option to alter the number of segments - facets insitu, after the model has been constructed by means of dynamics?
Just a thought :)
Nice illustrations
@André da Silva:
I'd be very interested to see some of the mechanical modeling you've done -- we're currently looking for some nice examples of MEP models to include in our gallery. If it suits you, can you please contact me? aidanc@google.com Thanks!
Aidan
Hi everyone, I am completing the model of a temple with some traditional elements that most often can be seen in South India. Carved pillars, arches and some other architectural elements. This article explains what I have gone through. I started with 40s and eventually my model became too big to handle. I was forced to reconstruct the whole thing to reduce the number of faces but it was a very painful process and it took a long time to complete. My advice to everyone using SU: start your model with small faces right from the beginning. If you do architecture most of the detail will not be seen when you show it to the client. Even if you do render the image still most of the detail is not possible to see. Lesser faces will not damage the present-ability of your model, believe me, but it will save you lots of nerves while working with the model. And Dave is right! You can always make a copy of a separate elements and develop them in a new files where you want to show more detail. It is a much more efficient way to do it.
Thanks, Visvambhara
Yes! this idea is great. It is very useful to everybody.
Yes it's a great idea if you only think about Sketchup side but what about rendering quality?
And I completely agree to Visvambhara, unfortunately, after surfaces extrusion, impossible to change anything. The best would be to use a low number of surfaces when drawing and being able to increase the number of faces, maybe save it in ddifferent file, just to render it with the highest quality.
@André What about introducing Bezier curves to SU? It would be the most waited feature for sure.
This article has been very helpful to me as well - I'm a self taught SketchUp user (designing signage) and have struggled to get nice curves - In the past, I've actually imported my curved objects as dxf files, with many points along the perimeter, to get them smoother than the sketchUp default - My hope is that there will be a solution in the future to have nice smooth curves without the massive file increase - Maybe a "pipe dream" but in my field, where scale is not necessarily as big as a building, I'm probably going to use the radius trick to increase the amount of sides I have rather than decrease and hope for not too many crashes... - Thanks!
I've been ''entity info / segments no.'' all this time and didn't know about the ''s'' after the nomber thing... Argh, so much time lost!
I agree with James Ogston about his idea of a dynamic way to change the no of segments after modeling, could be useful sometimes.
Thanks!
So this is the opposite of this post, but is there a way to change the default 12/24 segment setting? I often need higher segments for curves (and then rendering)...
after drawing the hexagon, now wat do i do to come up with curves. I am a new learner of sketchup plis advice
I tried to do this, but it does not seem to work. I create the circle by choosing the circle tool, moving hte mouse to the desired circle center, pressing the mouse button, moving the mouse, releasing the button. I then immediately type a number like 96 and then s. Nothing seems to happen. No visible change, and when I push/pull to extrude I get the usual 24 sides. Am I missing something, like this only works in Pro? BTW, I am trying to INCREASE the number of sides. I am creating CAD files to feed to a 3D printer, and I want cylinders to be as round as possible!
@Leithauser,
After you enter the number of sides and the letter 's', are you pressing 'Enter' on your keyboard? If not, that's your problem. If you ARE, please let me know and we'll continue to troubleshoot.
Aidan
Thanks Aidan. I didn't notice this important issue. Now I have a following question:
In the case I make this one bike-rack a saved component (and clone it all around the city), what economy should I have.
Hi I'm trying to make 3d prionted vases and get them smooth not faceted. I'm drawing a profile, offseting it and then placing it on a circular base at right angles, and then using the follow me tool to spin it into a vase. I can make my circular base have as many or few facets as I like but I can't get follow me to work except with 24 facets. Is there a way around this please? I don't see a point in the process where i can type in "96s" and "enter"
Post a Comment