
Both SketchUp and LayOut include Templates: pre-designed files which you can use as a starting point for your own work. There's a way to use custom Templates in both applications to simplify your printing and presentation workflow. Basically, you can set things up so that a SketchUp model automatically populates a multi-page LayOut document with a number of pre-set views.
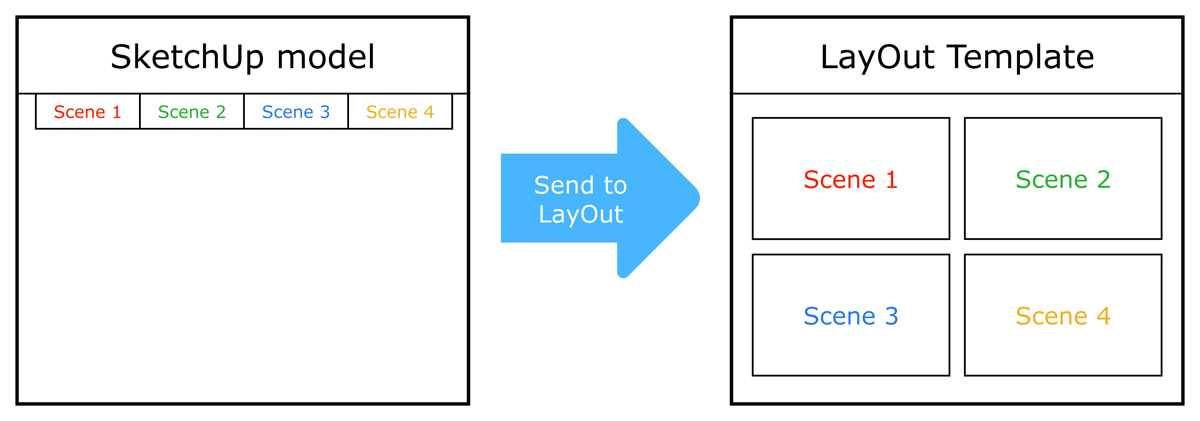 This technique allows you to auto-populate a LayOut Template with a set of Scenes from a SketchUp file. (Click to enlarge)
The key is to use Scenes in SketchUp that correspond to specific viewports in a LayOut Template. LayOut will automatically populate each viewport with the right model. Confused? Read on for a concrete example...
Let's say you're a furniture designer who always needs to produce a three-page brochure for each new piece you design. The three pages are:
- Page 1: Glossy Perspective View
- Page 2: Isometric View
- Page 3: Orthographic Views (Top, Front, Side)
Getting set up in SketchUp
The first thing you need to do is create a SketchUp Template that you can use for each furniture piece:
- Start by opening a new SketchUp file.
- Import a furniture model; you'll use this to set up the Template you're making.
- Create a Scene for each of the views you want to show in your brochure. In this case, there are five: Perspective, Iso, Top, Front and Side.
- Save your file as a Template by choosing File > Save As Template... from the menu bar. Call it "Furniture Brochure Template".
- Save your file somewhere on your computer. Call it "Furniture Brochure Working File.skp".
 Create Scenes in SketchUp that correspond to the model views you want in LayOut. (Click to enlarge)
Getting set up in LayOut
Every brochure you create will be exactly the same except for the furniture and a bit of text. The logo, the contact info and the general layout shouldn't change. After all – your brochures are part of your brand identity. Since you're about to create numerous LayOut documents that are all very similar, you (wisely) choose to create a custom Template. You start by creating a new three-page document that looks like this:
Once your Template is designed, here's what to do next:
- Insert the SketchUp model file you created earlier.
- Place a different view of the model in each of the five areas of your LayOut document.
- For each, scale the bounding box to fit, then assign a Scene using the Scene drop-down menu in the SketchUp Model dialog box.
- For the orthographic views (Top, Front and Side) on page 3, you can also assign a scale – in this case, 3/4" = 1' (1:16).
- Now save your LayOut document as a custom Template: Choose File > Save As Template... from the menu bar. Call it "Furniture Brochure Template 1".
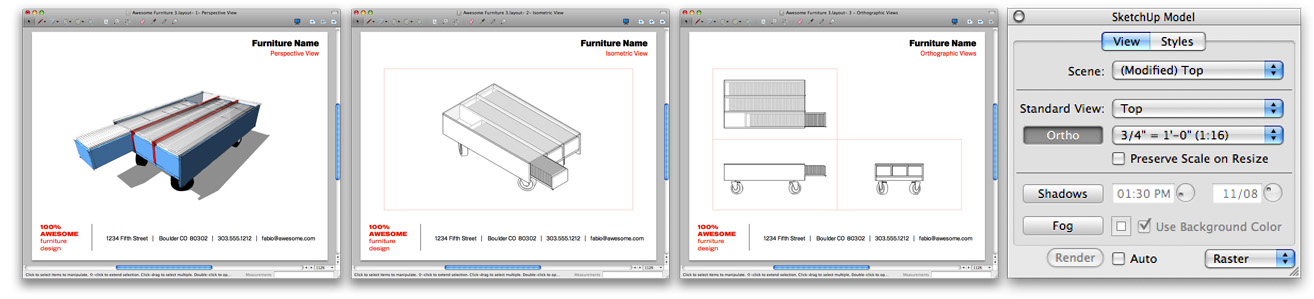 When you "Send to LayOut", the Scenes from SketchUp auto-populate the LayOut Template you created. (Click to enlarge)
Using your new workflow
Now that you're all set up, you can start saving time. Here's how to proceed:
- Open a new SketchUp file using the Template you created earlier. In this case, that's "Furniture Brochure Template". You can choose to start with a specific Template from the Welcome to SketchUp dialog box (Help > Welcome to SketchUp).
- Replace the stand-in model in the Template with the model you'd like to feature in a LayOut brochure.
- Go through each Scene and make sure your model looks right and fits properly in the modeling window. Zoom, Orbit and Pan to correct the view, then Update the Scene.
- Save your SketchUp file.
- Choose File > Send to LayOut from the menu bar.When LayOut opens, find and choose the LayOut Template you created earlier. In this example, that's "Furniture Brochure Template 1".
- Go through your LayOut document and check to make sure the new model looks right in each viewport. Where it doesn't, correct the view.
- Add custom text, labels, dimensions, graphics and photos to complete the document.
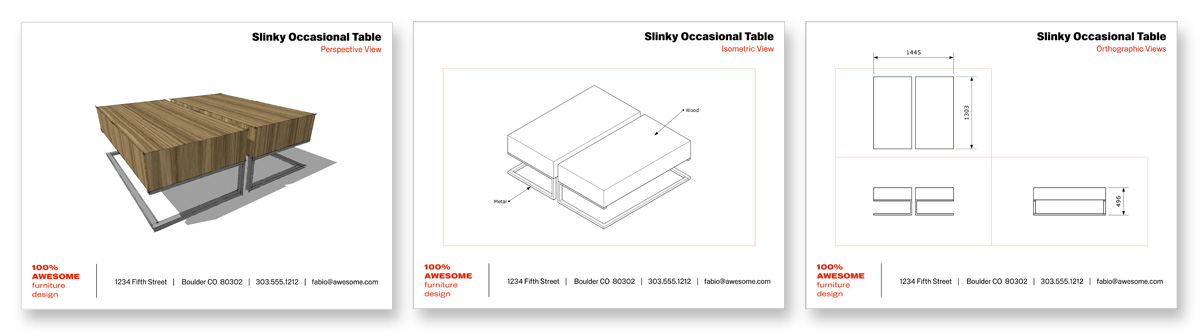 A brochure in LayOut created with another piece of furniture (Slinky Occasional Table by Maxime Garcia – moboille on 3D Warehouse) (Click to enlarge)
Posted by Aidan Chopra, SketchUp Evangelist and Barry Janzen, QA Engineer
Permalink | Links to this post |

6 comments :
Вокруг Света с Тимоном и Пумбой мультфильм / Around the World with Timon & Pumbaa
электронная почта без регистрации
Ill have to give that a go. it could save a heap of time. Thanks
Wow, this was so inspiring, I brought out the key running shoes and cartoons comments. Anyone who ISN'T promoting their own products find this mildly interesting or useful? :-)
b
Barry,
Thanks for the time you put into this. I find it very helpful.
Jeremy
As a new layout user this is very helpful.
Thanks
Hey, I REALLY appreciate this brief tutorial. I've been having the hardest time trying to figure out what appears to be so simple. The folks at SU didn't did a nice job with Layout, but it's been hard to find valuable tutorials like yours.
Would it be possible for you to create (or direct me to) another tutorial along the same lines except one that shows how to include in this template scenes of sections? I've been breaking my brain trying to figure this out, but I can't get it to work right.
If, for example, I want to add two section views to your list of 5 views, I can't get it to work right in SU. It's as if I have to choose whether I want a series of scenes to have sections or no sections. When I try to do both, they mess each other up and don't remember the preferences I've set.
Post a Comment